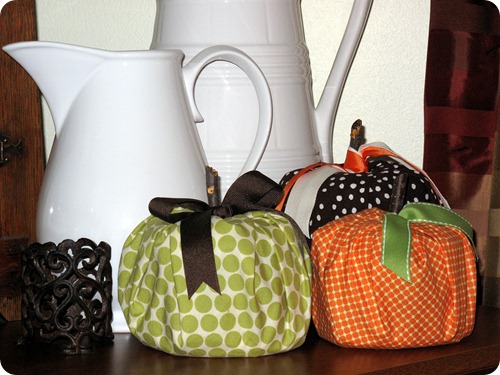
 I first made these pumpkins years ago when I was in charge of crafts for our MOPS group at church. They were so popular, we did them more than once. There are several variations of these floating around, but I thought I would share what I have found to work the best.
 This is what you will need for each pumpkin:
1 roll of toilet paper
1 fat quarter of fabric {approx 22"x18"}
1 sheet of newspaper or tissue paper 1 stick about 4-5" long
1 12" piece of ribbon
 Find a hard surface to work on. Lay out your fabric, wrong side up and then lay your sheet of paper on top of that. Place your tp roll in the middle.
 Next you will use the palm of your hand and push straight down to squish your tp roll. {This way it won't look like a roll of tp you wrapped in fabric when your done.}
 Grab the corners of the paper and bring them to the middle and tuck into the center of the tp roll. Make sure to tuck the shorter sides in under the longer corners so it is all secure, but please don't worry about it being perfect.
 Next you will do the same thing with the fabric. Bring the shorter sides up first and work them into the middle and then bring up the corners to tuck in, gathering all the way around so that all ends get tucked in. It won't be perfect, but that is ok. Each one will look different in shape and fluff. You can even use a half empty roll to make a smaller one like my orange one in the first picture.
 See? not so perfect, but pretty cute.
 Last thing is to shove your stick right down in the middle and tie a bow around it. The stick should fit pretty snuggly, but you can hot glue it if you want.
I'm too lazy to heat up my glue gun if it isn't absolutely necessary so mine is not glued. {Plus, if I glue it then I can't unwrap it and use that roll of tp in an emergency....you can really never be too prepared}
These are super inexpensive so you can make lots and use them all over the house. One of my favorite ways to display them is to line them up the edge of my stairs on every other step. It won't even matter when your kids knock them over because they can't really be broken. I don't know about you, but that's important around my house.
Happy crafting and let fall begin!!
{yes, I know it doesn’t actually start for like 3 weeks, but in my mind it’s already here}
this post is linked to: DIY fall festival, Fall frenzy, Remodelaholic, A little knick knack, Simply designing, Chic on a shoestring, Frugal Friday,Pumpkin seed party, Weekend round-up, Tutorial Tuesday, Pumpkin Party, Fall Festival
 Find a hard surface to work on. Lay out your fabric, wrong side up and then lay your sheet of paper on top of that. Place your tp roll in the middle.
  Next you will use the palm of your hand and push straight down to squish your tp roll. {This way it won't look like a roll of tp you wrapped in fabric when your done.}
  Grab the corners of the paper and bring them to the middle and tuck into the center of the tp roll. Make sure to tuck the shorter sides in under the longer corners so it is all secure, but please don't worry about it being perfect.
  Next you will do the same thing with the fabric. Bring the shorter sides up first and work them into the middle and then bring up the corners to tuck in, gathering all the way around so that all ends get tucked in. It won't be perfect, but that is ok. Each one will look different in shape and fluff. You can even use a half empty roll to make a smaller one like my orange one in the first picture.
  See? not so perfect, but pretty cute.
  Last thing is to shove your stick right down in the middle and tie a bow around it. The stick should fit pretty snuggly, but you can hot glue it if you want.
 I'm too lazy to heat up my glue gun if it isn't absolutely necessary so mine is not glued. {Plus, if I glue it then I can't unwrap it and use that roll of tp in an emergency....you can really never be too prepared}
These are super inexpensive so you can make lots and use them all over the house. One of my favorite ways to display them is to line them up the edge of my stairs on every other step. It won't even matter when your kids knock them over because they can't really be broken. I don't know about you, but that's important around my house.
Happy crafting and let fall begin!!
{yes, I know it doesn’t actually start for like 3 weeks, but in my mind it’s already here}
this post is linked to: DIY fall festival, Fall frenzy, Remodelaholic, A little knick knack, Simply designing, Chic on a shoestring, Frugal Friday,Pumpkin seed party, Weekend round-up, Tutorial Tuesday, Pumpkin Party, Fall Festival









I've seen these before, but had forgotten. What a wonderful tutorial. I also love, love, love your peanut butter kisses on the header. Kisses are $13.00/bag here in Australia, so needless to say; I really miss those cookies.
ReplyDeleteSo cute - and easy! I'm going to have to make some for my table "centerpiece" for upcoming fall bday parties!! Thanks!
ReplyDeleteHa! I LOVE this idea! I could do it with my kids! I'm totally doing this. Love it! Great idea~
ReplyDeleteI'd love it if you would link up to my Friday link party! Have a wonderful weekend. http://alittleknickknack.blogspot.com/
These are sooo adorable! I have a 16 month old, so it's great when I find crafts that aren't breakable! Thanks for sharing!
ReplyDeleteThose are really cute!! :-)
ReplyDeleteI posted a comment on my blog about this great idea! Thanks
ReplyDeletehttp://paintedstudio.blogspot.com/2010/09/another-idea-from-web.html
Your pumpkins are delightful! I've been making a lot of pumpkins also! It's great to see all the variations of Pumpkins! Thanks for sharing. I love your fabrics!
ReplyDeleteHave a beautiful day!
Love, Brenda
I love these - so cute and easy!!!
ReplyDeletethese are fun!! ...and now added to my list of crafty things to do... sigh, the list goes on and on.
ReplyDeleteVisiting via weekend wrap up. These pumpkins are adorable. It is such a clever idea.
ReplyDeleteThis is adorable and I love that green fabric(i it Amy Butler)
ReplyDeleteHave a wonderful weekend and thanks for the visit!!
This is sooo cute! I love fabric but can't sew so this is perfect craft for me! Thanks for the great idea!
ReplyDeleteI can't believe how easy this is! So cute. The fabrics are gorgeous.
ReplyDeleteSo cute, so frugal, so easy! What a great craft idea! I am so gonna do this!!!
ReplyDeleteWhat a great idea! I am going to make some of these this week. Thanks for sharing.
ReplyDeleteSuper cute! I saw these recently for the 1st time in another post. I like the toilet paper idea. Now, to go buy some cheap toilet paper. Thanks!
ReplyDeleteWow they had something like these for sale at a craft gift store in my home town for $20 a piece and because I can't sew, I almost bought one!
ReplyDeleteI can't believe how easy these are. Off to buy some fabric!
Wow they had something like these for sale at a craft gift store in my home town for $20 a piece and because I can't sew, I almost bought one!
ReplyDeleteI can't believe how easy these are. Off to buy some fabric!
I guess I know what I'll be doing this morning! :)
ReplyDeletelove that! thanks for sharing. bet i could do apples for the fall too.
ReplyDeleteI love this, so fun and easy and I could easily do it with the kids!
ReplyDeleteso adorable!
ReplyDeleteSuper cute and simple! great quick and easy festive decor :) Hopping over from Tatertots & Jello Linky party!
ReplyDeletethis is a brilliant idea! I love it and am now going to make lots of them to stick all over the house! :)
ReplyDeleteThis is my first time to your blog and I think it's beautiful! I'm looking forward to following along with all your posts! :)
I LOVE these and I'm totally stealing this idea :) Thank you so much for this inspiration!! :)
ReplyDeleteSo cute!
ReplyDeleteI love these. I made one last year and can't wait to make a few more this year. I love that you used different fabrics with cute patterns instead of just orange.
ReplyDeleteLove this idea thanks for inspiration
ReplyDeletethese are so terrific! I will be decorating with these around our house for sure! Thanks for the affordable, easy idea!
ReplyDeleteAbsolutely precious! Just found your blog via the Fall Frenzy party at Craftaholics Anonymous - thank you for the really neat idea and easy instructions!
ReplyDeleteThese are the cuttest, and easiest fall decorations ever. I guess extra toilet paper will be getting added to my grocery list. Thanks for sharing!
ReplyDeleteAdorable idea! I think my daughters would love this craft, too. Thanks for sharing.
ReplyDeleteNow that's my kind of craft - easy & cute!
ReplyDeleteWOw. So adorably cute! I'm going to try these this afternoon - thanks!
ReplyDeleteJust wanted to say thanks! I saw this post yesterday and fell in love with them! I made 3 of them today and im sure more are on theyre way!
ReplyDeleteI love this! I would love for you to link it to my pumpkin link party! http://alittlemoore.wordpress.com/2010/09/07/pumpkinparty/
ReplyDeleteThis was so cute, I had to feature it on my blog! I hope you can stop by and grab a featured button! Have a wonderful night.
ReplyDeletealittleknickknack.blogspot.com
absolutely positively adorable!
ReplyDeletesuch fun too. wouldn't these be fun to give to people who are going camping. ha! i only say that because everyone i know has been on a camping trip recently.
thank you so much for linking up with the FALL FESTIVAL! this is so fun.
kellie
HI - I made a bunch of these yesterday. So easy! I ran out of newspapers so I used plastic trash bags instead. Thanks for a great post!
ReplyDeleteLOVE these....I made some stuffed pumpkins last year, but these are SO MUCH easier....I'll have to give them a try!
ReplyDeleteThanks for the inspiration!
Suzanne
Found you via this Blessed nest...
ReplyDeleteThanks for sharing this idea... I will be trying it later this week
Soooooooooo absolutely darling, and EASY!! I'm all about the ease of things. Cute!
ReplyDeleteOh how cute! These are such darling little pumpkins! I'm going to get some fabric over the weekend and try these myself.
ReplyDeleteFlippin fantastic idea!!
ReplyDeleteCUTE!!!! Love it.
ReplyDeleteI made my own burlap version of this pumpkin...and linked to your blog! Check it out here:
ReplyDeletehttp://christinasadventures2010.blogspot.com/2010/09/beginnings-of-fall-decor.html
Thanks for the inspiration! I'm a new follower :)
What a cute, easy idea!!! Love it!
ReplyDeleteHi Alisa! I was so inspired by your project I made one yesterday! I hope you don't mind that I linked up your blog!
ReplyDeleteI made these today and gave you a shout out. :) Check mine out if you would like. http://tanya-alittlebitofeverything.blogspot.com/2010/09/toilet-paper-pumpkin.html
ReplyDeleteI just started my own blog this week and I did this project myself which ended up in one of my pictures. I linked it to your blog. If you would like to visit it can be seen here:
ReplyDeletehttp://www.ourhumblehaven.blogspot.com/
Thank you!
So stinkin' cute! I featured your pumpkins on my blog today:
ReplyDeletehttp://oopsey-daisy.blogspot.com/2010/09/pumpkin-patch-at-oopsey-daisy.html
Thanks for the inspiration!
~Alison
I make these too, but not exactly like this. With 10 people in the house, toilet paper is too valuable to tie up that way I guess. LOL Anyway, I use the empty toilet paper tube, set it in the middle of the fabric and stick some polyfil around it and then pull and tuck the fabric, add the stick and embellish. It makes them a bit rounder and squishier and you can make several with one bag of polyfil. My mom even made some larger ones by using a piece of a paper towel tube.
ReplyDeletewhere did you get the fun fabric?
ReplyDeleteThese are absolutely adorable! I have been looking for something fun and cheap to make and put out- this is perfect!! Thanks for posting.
ReplyDeleteI'd almost forgotten how cute these pumpkins can be! I linked to you and your directions at http://www.joyfullythriving.com/2010/09/pumpkin-links/. You have a lovely site!
ReplyDeleteI'm your newest follower! I LOVE this project and am making some of these tonight!!! I also LOVE MOPS! I was on the craft team at my old mops group but I moved and my new group doesn't do crafts.
ReplyDeleteThese little pumpkins are SO up my alley! Thanks for sharing the how-to's! I appreciate it! ~ Bridget
ReplyDeleteI featured you on my blog...
ReplyDeletekimboscrafts.blogspot.com
Brilliant! Thanks so much for sharing!
ReplyDeleteSo easy and fun!!
Hope you had a great weekend!
KareyEllen
KareyEllenDesigns.blogspot.com
Thanks for the great idea, we are making these in my MOPS group tomorrow.
ReplyDeleteThese are so cute and my daughter and I had so much fun making them I put them on my blog with a link back to you. Hope that's ok...
ReplyDeleteDARLING!! hope to make some of these soon!!
ReplyDeleteLove this! So simple. Great blog! :)
ReplyDeletehttp://munrobunch.blogspot.com/
Crafty I am not, this is something even I can do!! Cute!!
ReplyDeleteDo you have any similar Christmas decorations? I was thinking these would be cute made into Christmas ornaments but I'm not sure what you would use for the hook? Any suggestions?
ReplyDeleteThis comment has been removed by a blog administrator.
ReplyDeleteVery nice pumpkins out of toilet paper. I will try also your technique. You got a very nice idea.
ReplyDeleteThis comment has been removed by a blog administrator.
ReplyDeleteWhat a nice idea! We will be making them at an upcoming MOPS craft night. It makes me all warm and fuzzy to see that you are a MOPS crafter too! yay!
ReplyDeleteJust googled...because I couldn't remember how much material I needed to make a TP pumpkin...and your blog came up. I enjoyed looking around. LOVE your TP pumpkins. Very cute! They inspired me. I have made several TP pumpkins, but like the stick and ribbon look of yours. I'm a missionary in South America where pretty pumpkins aren't available so I LOVE being able to make my own TP pumpkins to help decorate our home for Fall. =)
ReplyDeleteBlessings,
~Heather~
This comment has been removed by the author.
ReplyDeleteOh I love these!! I'm going to *try* and make some of these with my son!! Thanks for sharing!!!
ReplyDeleteMarlene
Yoga Teacher Training in Thailand School