
Thank you for joining us for our Stampin' Up!® Demonstrator Training Program Monthly Blog Hop! I hope you find ideas and creative inspiration as you visit all of the blogs. We are a group of Stampin' Up!® Demonstrators from around the world that are taking part in training that is helping us to build a successful Stampin' Up!® business and reach goals we have set. We really appreciate your support.
You may be starting here or have come from another blog - either way you can find the link list at the bottom of this post so that you can see every blog post and idea today. We really appreciate your support.

My customer Thank You cards for March are the easiest pocket card I've ever made. I watched Karen Titus' video the other day and was inspired! These cards came together very quickly; you will also find these cards are a great way to use your designer series paper.
Begin with a 12" x 12" Designer Series Paper. Cut one side (directional paper will need a bit more thought before cutting) to 10 3/4 ". Score this at 1" and 5 1/2" - you will fold the 1" piece down on the front of your card. Now turn your paper 1/4 turn (the 12" side will be at the top of your Paper Trimmer.) Cut at 4" and 8". HINT: be careful scoring your DSP as it is not as sturdy as cardstock.


Fold on the score lines, the one inch fold is toward the front. You can decide which side of the DSP you want on the front. I mixed it up a little, choosing my favorite for the third card.


Next I stamped the insert with a sentiment and put a strip on the bottom of Basic White cardstock cut at 3 3/4" x 5". The envelope also has a stip of DSP on the bottom. The sentiment is from Honeybee Home Stamp set. I used my stamparatus to quickly stamp 12 inserts. Three rhinestone basic jewels accent the bottom corner.


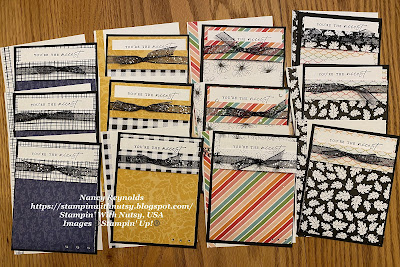
I now have my thank you cards ready to go!
 Host Designer Series Paper")


")
 Glittered Organdy Ribbon")


Love your cards! That paper is so amazing!
ReplyDeleteSo pretty, and what a great use of DSP!
ReplyDeleteFabulous cards! Great use of this DSP!
ReplyDeleteThis is a great idea! Your customers will love it.
ReplyDeleteThis fold shows off the DSPs beautifully! Thank you for taking part in our Demonstrator Training Blog Hop this month.
ReplyDeleteLovely cards - and such great use of DSP!! Thanks for sharing.
ReplyDeleteGreat use of the DSP
ReplyDeleteThis pocket card layout is one of my favorites! I love that you changed up each card a bit by changing the DSP. :)
ReplyDeleteLovely card Nancy, great way to use this lovely dsp x
ReplyDeleteLovely cards. Just try this layout. Thanks for sharing
ReplyDeleteYour card are nice, have a wonderful day.
ReplyDelete