
Welcome to the Tech 4 Stampers blog hop. I’m blessed to be part of super talented group of demonstrators from around the world. I’m from Nashville, Tennessee. That’s in the southeastern part of the US and home of country music. My measurements are all imperial but shouldn’t be too hard to convert to metric. I met the lovely people participating in the blog hop when I started building my website over a year ago. I love being on this journey with them!
The theme this month is new beginnings. That’s pretty broad and had me pondering ideas for a while. So many choices – new day, new week, new year, new house, new marriage, new baby… I could go on forever. It finally hit me that I could share what I do with one of my favorite new beginnings. I love the feeling of having a new box of products delivered and starting crafting right away. That’s an awesome new beginning!
If you have just discovered card making, your new beginning might be figuring out what that new box should have in it. You might be selecting tools and supplies for your new hobby. My approach to a new box is much the same. The goal is to make sure to include what you need to be creative when the box arrives.
If you are a seasoned stamper you might be selecting projects for products from the current catalog. It’s the same for you also. You are making selections that will work together and work with items you already have. And aren’t you lucky with all the coordination of Stampin’ Up! products!
You might have a wishlist that’s over $100 and be wondering how you could get a discount. Good news! There is. I don’t want to lose sight of today’s topic so I’ll point you to more information and ask that you reach out to your demonstrator or to me, if you are in the US and don’t have a demonstrator to guide you. You’ll find more info about the being a discount shopper here. You’ll find more info about me here.
Open the Box and Get Started
I think what’s most important to someone beginning to get crafty with Stampin’ Up! is that when the brown truck shows up with your box, you can open it and get crafty. EVERY box that arrives at my door is a new beginning.
Here’s where I start. I take full advantage of the coordination Stampin’ Up! gives me. I get all the pieces to the new suite out as well as the coordinating cardstocks and inks. I’m going to CASE something. I might CASE the catalog. I might CASE another demonstrator. Chances are I’m going to CASE a favorite sketch. What the heck does all that mean? CASE stands for Copy and Share Everything or Copy and Selectively Edit. I search the samples in the catalog and refer to the recipes Stampin’ Up! provides to demonstrators. HUGE resource! I search the groups and teams I belong to. I have about 6 go to sketches. I’ll start with one project and go from there.
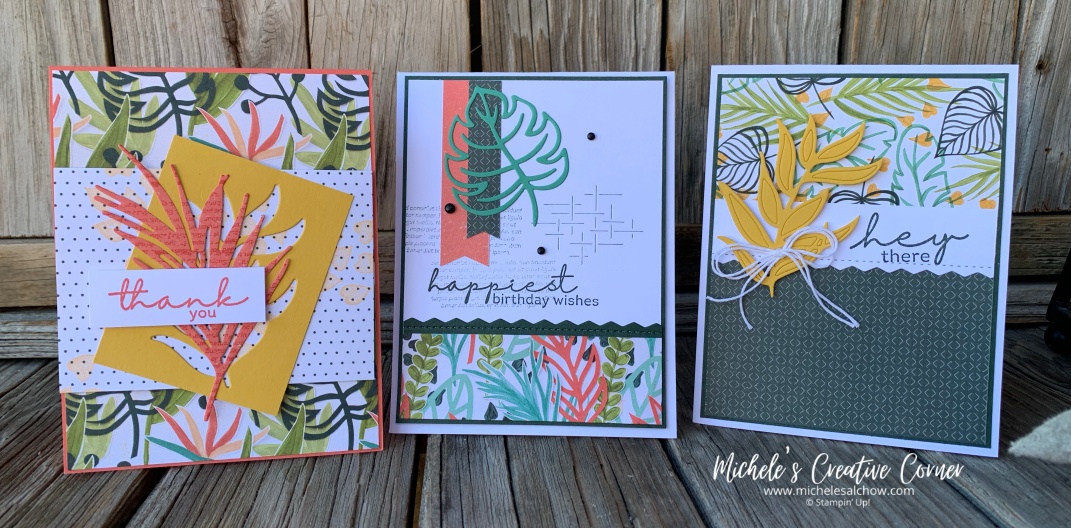
Let’s start CASEing. I selected the Artfully Composed Suite for my samples. I love the combination of greens in this suite and know that once I jump in I’ll be able to mix these products in with other stampsets and greetings and have cards for every occasion.

The Catalog
The Artfully Composed Suite is found in the January – June Mini catalog, page 32 in the US version. I selected the sample in the bottom left corner of page 32.
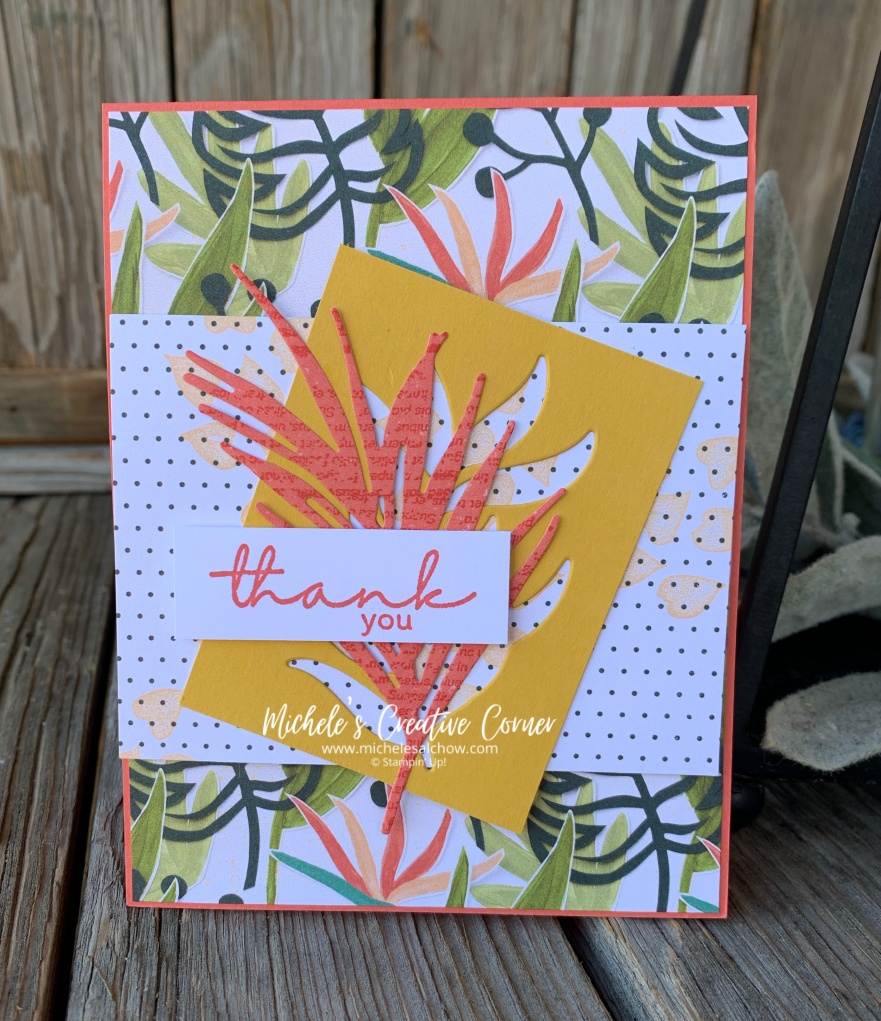
- Calypso Coral card base, cut 4.25 x 11 and scored at 5.5
- DSP (designer series paper) 4 1/8 x 5 3/8, adhered to base
- DSP (dot pattern) 3 x 4 1/8, stamped in Pale Papaya ink. I attached it to the card with dimensionals after I layered the other pieces on top
- Bumblebee cardstock 2.5 x 3.25, die cut the detail leafy branch. Use the negative image on this card and the detailed cut on on the 3rd card. Adhere to DSP
- Calypso Coral cardstock die cut with the solid leafy branch. Stamp the script image in Calypso Coral ink on the die cut image. Using an Adhesive Sheet wouldn’t be a bad idea for this image. Adhere to Bumblebee layer
- Scrap of Basic White about 0.75 x 2.25. Stamp the greeting in Calypso Coral ink. Attach with dimensionals
- Attach the stack to the card with dimensionals
A CASE from Ange McKay
I am blessed with many training and stamping opportunities. I’m double blessed when the 2 come together which they did in January. Ange McKay shared some gorgeous projects, and this is 1 of them. I feel like I’m giving you some secret sauce. I stamped and die cut the white layer 5 times before I was satisfied. Don’t give up! This is so worth it.
- Thick Basic White card base, 4.25 x 11, scored at 5.5
- Evening Evergreen 4 x 5.25. Attached with dimensionals in the last step
- Basic White 3 7/8 x 5 1/8. Use a stamparatus for the stamping
- DSP 1.25 x 3 7/78
- Evening Evergreen 0.5 x 3 7/8. Die cut the edge. Adhere to back of the DSP
- Coral pattern DSP 0.75 x 3. Flag one end
- Evergreen pattern DSP 0.5 x 2.75. Flag one end
- Scrap of Just Jade, die cut with detailed large leaf. An Adhesive Sheet wouldn’t be a bad idea. Ask me how I know
- Determine placement of the die for the white layer. I laid out the individual pieces and lightly marked with pencil. Then I die cut. I didn’t expect this to add as much texture and interest as it did. Thank you, Ange
- Now the stamparatus. I actually stamped the greeting in Evening Evergreen ink. Then I added the scripty image 4th generation. Stamp on your grid paper to determine how many times you should stamp off.
- Layer all the pieces to the white layer and then to the evergreen layer. Add the stack to the card with dimensionals
- I added embellishments from the Classic Matte Dots
CASE a Favorite Sketch
I have several sketches or card designs that I turn to for a starting point with a new suite or bundle. The dies in the Tropical Layers Dies are great for layering! I chose this particular sketch because it called for such a focal point.
- Thick Basic White card base cut 4.25 x 11, scored at 5.5
- Evening Evergreen 4 x 5.25 (It worked so well for Ange’s card)
- DSP 3 7/8 x 5 1/8, cut to create a piece that is 3 7/8 x 3 and a piece 3 7/8 x 2 1/8. Make the cut where you want based on the placement of the die cut and greeting. Adhere the pieces to the evergreen layer
- Basic White cut 3 7/8 x 1.25, die cut the edge. Stamp the greeting in Evening Evergreen ink. Adhere to the DSP and cover the seam
- Bumblebee die cut from the 1st card. I carefully added mini dimensionals to hold the detail in place. Can you think of an alternative?
- Tie a double bow with white twine from the Baker’s Twine Essential pack. Adhere with a mini glue dot
Hopefully I’ve given you some ideas for approaching a new suite of products, and I hope you enjoy my projects and have enough details to recreate them yourself. I know you will enjoy the talents of the other demonstrators in the hop.
CASE the Catalog 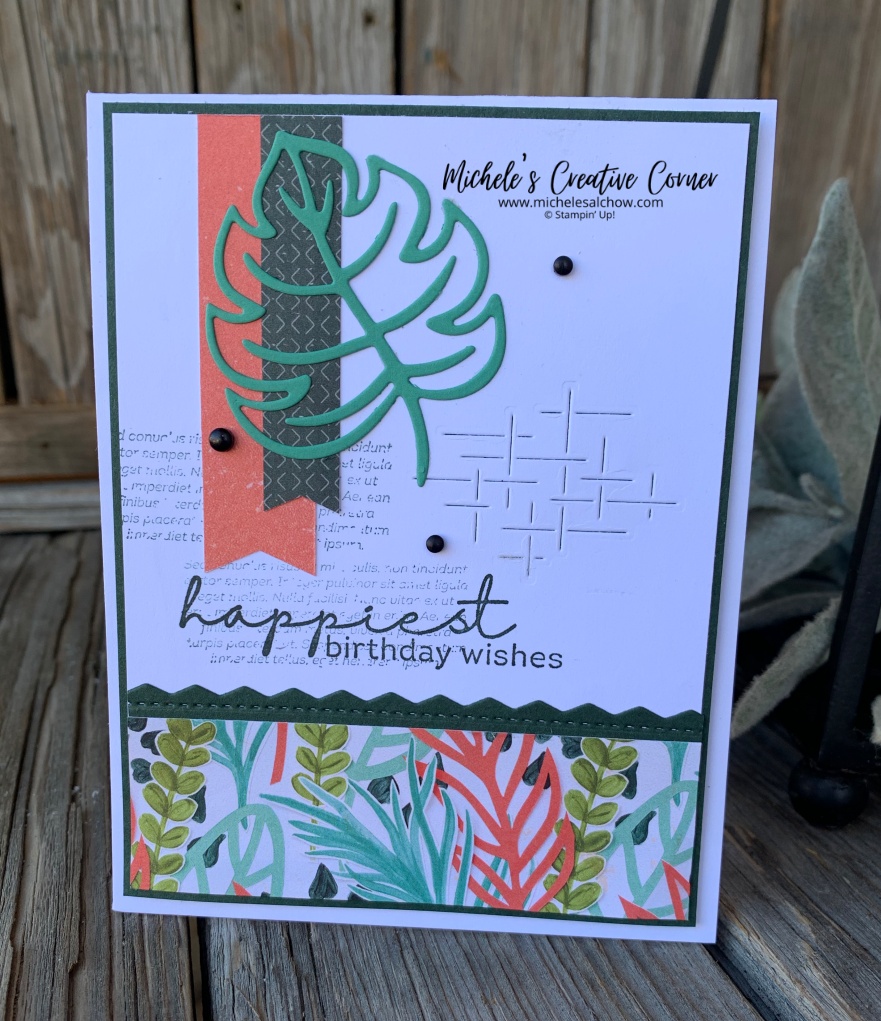
CASE Ange McKay 
CASE a sketch
")
")
")

 Designer Series Paper")


I would love to hear from you and know what you are creating today. Please drop a comment or email and let me know. hello@michelesalchow.com. If you would like to receive an email with every blog post please complete the form at the bottom of the post.
Stamped Blessings,
Michele
The Best Value
A Few Details
- Your choice of $155 in products
- FREE shipping
- Ongoing 20% Discount
- $99 plus tax
Learn more about the Monthly Card Club here
Learn more about the Birthday Class Series here
Designer Series Paper is on Sale 15% Off in June!
Shop Here

Love your colourful cards. It’s amazing where we can find inspiration from and to share those ideas with others x
Thank you! That means so much.
Beautiful cards Michelle. Fabulous use of colour x
Thank you Leighsa.
Lovely and colourful!
Thank you, Katy.
Wow Michele what an engaging post and beautiful cards. Tfs
Thank you, Elaine. That’s very kind.