


Hello and welcome to my blog. I am thrilled to be taking part in a blog hop with fellow demonstrators, from around the world, who are part of Kylie Bertucci's training program. There is no theme for the hop, but there is sure to be a wealth of inspiration for creating with Stampin' Up! products.

I have had so much fun making these shaker projects - I completely indulged myself! I have had a little box frame sitting in my craft room for several months, just waiting for the right project. This project is it! I have teamed up the Honey Bee Bundle and a product that is a blast from the past - Shrink Plastic! The idea to use Shrink Plastic bees as the shaker element in the frame popped into my head, and it just goes to show that it is true that us avid craft collectors should never throw anything away, just in case it might be useful one day! It was in a safe place and luckily I was able to locate it quickly.

While the shrunk bees are still warm it is possible to flatten them with an acrylic block. Some of them I left slightly curled because it added to their charm.

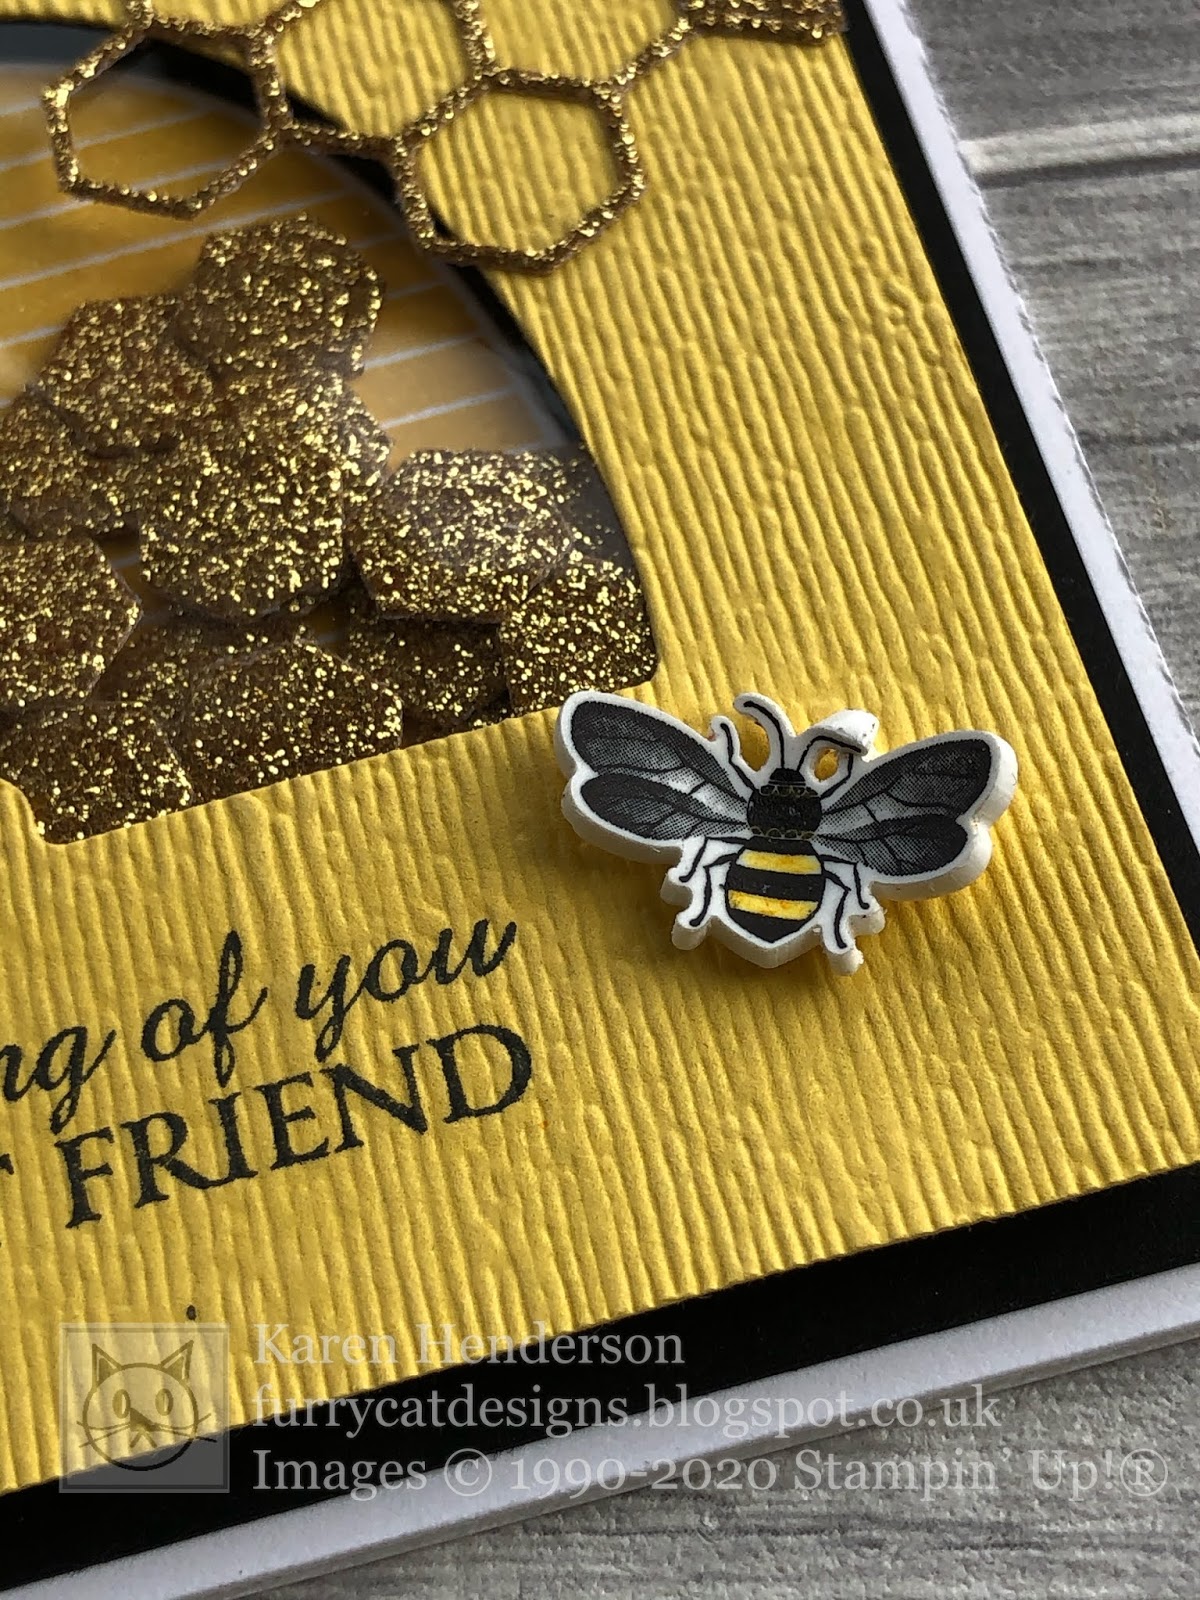
The backdrop for the frame is made from black card. The sentiment is heat embossed in white and then the whole layer is embossed using the Subtle folder. The honey comb is die cut from Gold Glimmer paper and the bee hive is stamped in Daffodil Delight to match the ribbon decoration (the band of ribbon sits beneath the glass, but the bow is attached with a glue dot on the outside). A small bee stamped on Whisper White card serves as the Queen bee.


To assemble the card, I piled up some of the gold hexagons onto the beehive and then prepared the topper.

I used Window Sheet to over the apature and then used the Foam Adhesive Strips to surround the beehive section of the card (to encase the hexagns) and extra foam strip around the edges of the card to ensure that they were stable (and all the same height).

Even though yellow isn't usually one of my go to colours, I am really happy with how these projects have turned out and to have extra decoration in my craft room. Thank you for visiting my blog today - you are currently visiting Karen Henderson. Please look at the list below to see who to visit next. I am sure you will find lots of inspiration on your journey around the hop. Make sure you don't miss any!
Blog Hop List:
If you want to purchase the items used for these projects, or any other supplies, please take a look in my online Stampin' Up! shop. You can follow the link or click on the pictures below of the products I have used today.
As always, happy crafting,

If you would like to order any supplies, and you live in the UK, I would love to be your demonstrator. Use the hostess code 7BQYE7P4 to get some free product (it will follow in the post after the end of the month). If your order is over £150 do not use the code as you become the hostess and get rewards. To place an order please visit my online shop HERE.
If you would like to join my team, you can choose your starter kit HERE and if you have any questions, please contact me at furrycatdesigns@gmail.com
Click on the images below to purchase them in my online shop:


What a terrific shaker card idea. I know I have some shrink plastic in my craft room ;) Thanks for hopping with me.
ReplyDeleteBonnie, I hope you have a go with your shrink plastic. It really is fun!
Deletewhat a fun project, beautiful
ReplyDeleteI had fun making them and I'm happy you like them!
DeleteOMG....what fantastic projects Karen! LOVE THEM!
ReplyDeleteWow! Thanks for your enthusiasm Kylie. Really appreciate your comment!
DeleteLove it!!! You've just moved this bundle from a maybe to a need! Thanks for the inspiration as always, Karen. xx
ReplyDeleteAngie, I'm happy to have influenced your shopping preferences! Glad you like my projects enough to want the set!
DeleteWow! What fantastic projects!
ReplyDeleteThank you Kylie
DeleteI love all your projects with this bundle, they are stunning. Thanks for the inspiration
ReplyDeleteLibby, thanks for taking the time to leave such a kind comment. Glad you like them!
DeleteSo many fabulous projects Karen! Inspirational as always. Thank you for taking part in our Demonstrator Training Support Program Blog Hop this month!
ReplyDeleteKylie, you are so very kind. Thanks for hosting such a fun blog hop!
DeleteLove all of these Karen. Fab Fab Fab 😀
ReplyDeleteThank you for taking the time to leave such a lovely comment Melinda. So pleased you like them!
DeleteThese projects are amazing. Congratulations!
ReplyDeleteSo pleased you like them. Thank you Leonie
DeleteLove the tiny bees. Definitely something I will have to try. Thanks for the inspiration!
ReplyDeleteOh Shelly, I do hope you try the shrink plastic. It's fun watching them shrink!
DeleteGorgeous projects x
ReplyDeleteThank you.
DeleteFabulous projects!😊
ReplyDeleteThanks Christy, I'm glad you like them!
DeleteHi Karen, hope you are well. What a fab card!!! Using shrink plastic is a brilliant idea, one I’m definitely going to case if you don’t mind. I wasn’t struck on this set for some reason when I first saw it, but it has grown on me, definitely going to get it and give this a go. BRILLIANT!
ReplyDeleteHi Rachel!
DeleteSo pleased that the projects have inspired you - feel free to CASE.
All is well here, hope you are too.
What a fun idea Karen! Love the shrinky dinks, so cute! :)
ReplyDeleteI haven't used shrink plastic for years, but crafting is just like fashion and the ideas and trends come round again!
DeleteStunning projects, I didn’t like this set at first but now that I have seen your projects I will buy it , thank you for the inspiration 😘
ReplyDeleteKristien, I am happy to have inspired you enough to NEED the set!
DeleteWow great idea! I love the Honey Bees! TFS!
ReplyDeleteHoney Bees are so special!
DeleteGreat projects Karen! I love this set too. Thank you for inspiring us with the shrink plastic
ReplyDeleteKate, I have used this set so much. The ideas grow when you keep using it, don't they?
DeleteLove your Project Card Karen. thanks for sharing and hopping with me. xx
ReplyDeleteGlad you like it Teresa. Hopping is fun!
DeleteSimply stunning projects. Thanks for sharing
ReplyDeleteOoh, you are very kind Tricia. Glad you like them!
DeleteGreat projects. Just lovin' those bees.
ReplyDeleteThanks Mary Jo. The bees sure are special!
Delete