
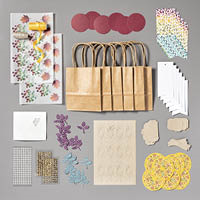
It’s time for the APPT 08-2019 Blog Hop! This month’s kit is called Gift of Fall and it is a beauty. There are lots and lots of die cut pieces to use, so you can mix and match them in many ways. There is also an Add-On Bundle available with coordinating note cards and envelopes. I used one of the note cards to create a 4-1/4″ x 5-1/2″ card, and I used tags from the kit to line a Clear Tiny Treat Box (I just love these little boxes; they’re so versatile!) Be sure to hop all the way around to all the stops of the APPT 08-2019 Blog Hop to see all the wonderful alternate projects for this month’s kit.
S
Here’s the kit:

stamp set:
S
Here’s the add-on bundle:

S
Here’s what I made:


I didn’t line the bottom of the box, but you certainly could. I wanted to save the rest of the tags for other projects.

This is the corner of the box where the two blue ends meet.

This is the corner where the red ends meet.

S
Here’s what I did:
Cut and scored with my paper trimmer:
- Blackberry Bliss card stock (CS) cut to 4-1/4″ x 11″, then scored in half at 5-1/2″
- 3 colorful tags from the kit cut to 2″ x 4″ and scored in half at 2″
- a note card separated into two pieces, the front and the back, cutting away the score line
- excess from the left end of the small banner with the card sentiment (after stamping)*
Stamped with the Gift of Fall stamp set:
- box sentiment in Pretty Peacock ink onto a small banner from the kit
- *card sentiment in Pretty Peacock ink onto the right end of a small banner from the kit (then cut away the excess at the left end)
Cut using a 1/2″ Circle Punch:
- finger notch in the side of one of the trimmed colorful tags, so it will be at the front of the box when inserted
Assembled the card:
- burnished the fold in the larger (Blackberry Bliss) card base with a Bone Folder
- Crumb Cake leaves glued onto the front of the card base along the left side and the top
- note card front adhered onto the front of the larger card base using Stampin’ Dimensionals
- sentiment glued onto the note card front, near the bottom left
- gold sequins applied onto the wreath image on the note card front
- note card back glued onto the inside of the larger card base
- vellum piece glued onto the inside of the card base
Assembled the box:
- burnished the folds in the box with a Bone Folder, and folded it into the box shape
- inserted two of the trimmed colorful tags to line the sides (I inserted them so the two blue ends would meet each other, and the two red ends would meet each other. I made sure the punched finger notch lined up with the notch in the front of the box.)
- inserted the third trimmed colorful tag into the box so it lined the top and continued down the back of the box (inside the piece already there lining the sides)
- 2 vellum pieces glued onto the back of the small banner with the box sentiment
- about 8 or 9 Crumb Cake leaves glued onto the back of the vellum pieces
- sentiment banner/vellum/leaves adhered onto the top of the box using Tear & Tape (you can use the glue dots that came in the kit)
- 3 gold sequins applied onto the vellum pieces
S
Here’s the APPT 08-2019 Hop:
S
Here are the colors in the kit:
You can see them all in today’s projects. Click on each one to see all the products that come in that color!
S
Here’s what I used other than what came in the kit:
Click on these images for more details and to purchase.


S
Here’s the refill:
If you are a Paper Pumpkin subscriber, you can purchase refills for this kit. It includes everything except the stamp set and ink pad.
S
Here’s the stamp case insert:
Click here to download and print
S
Here’s the official Stampin’ Up! video for this kit:
SS
Click here to order
your 2019 Holiday Catalog
DSP Swatch Books and Product Shares
by September 3!
S
Preorder the Pretty Petals Online Class by September 5:
- Make 6 cards at home in your PJs!
- 2 each of 3 designs
- Features the Pretty Petals Suite on pages 72-74 of the 2019-2020 Annual Catalog
- I’ve done the trimming and scoring for you!
- You’ll receive the stamp set, dies, embossing folder, pre-cut card kits, and 6 Very Vanilla envelopes.
- Full detailed instructions
- Limited spots available
Click on the image below for details and class options, or copy and paste this link into your browser: https://stampcandy.net/online-classes/pretty-petals-class-preorder/

S
Here are some helpful links:
- Shop my online store
- Clearance Rack
- SUBSCRIBE to my weekly newsletter and daily blog updates.
- September Host Code 6TNW9P6Z – receive free product!
- Paper Pumpkin: buy a Prepaid Subscription or subscribe month to month
- Earn Gumball Rewards – receive free products!
- Gift Certificates are available in any U.S. dollar amount from me. Contact me for details.
- Have you shopped from me within the past year? Join my private VIP Facebook group for exclusive project tutorials and more!
- Join my team and enjoy a 20% discount (or more) on all your purchases! You choose $125 in products and pay only $99, and get free shipping! No obligation! No selling required!
S
Thanks for stopping by today, and Sweet Stamping!


Candy, these are stunning – I LOVE that little box!
Thanks, Jeanna!