Hi there,
I hope this finds you well and that you’ve had a good week, ready to start the weekend. Maybe you found time to be creative.
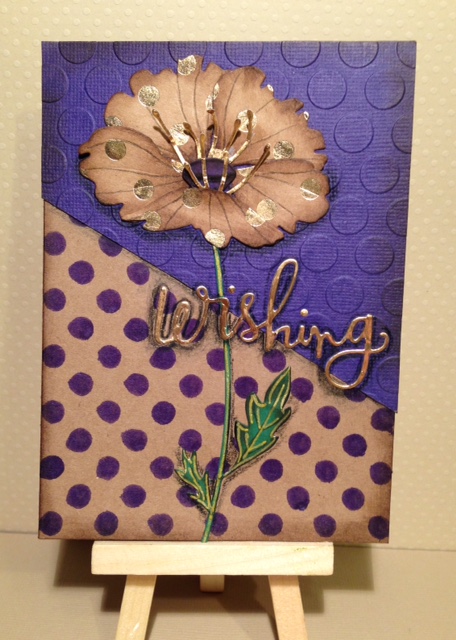
I’ve had this Simon Says Stamp Tattered Poppy Die for months and haven’t had a chance to use it until now. I’ve also been wanting an opportunity to use my Bazzill Basics Paper 6X6 kraft foil pad. I ordered this paper pad a year ago after winning a drawing at Jennifer McGuire Ink. I received one of each of the 6 patterns in this pad in the Simon Says Stamp April 2015 card kit. The paper is so beautiful that I ordered a complete pad.
Tips: “When putting away your Tattered Poppy Die, do not throw away the die envelope.” It was a challenge assembling the die cut petals on my card front. The die cuts are the same size as the petals on the envelope, so I covered the blossom picture with my die cut pieces. However, I had a problem picking them up and moving them to my card panel. I follow the blog, Jennifer McGuire Ink. She had a guest artist on her blog who made a floral card and moved all of her layout all together to her card panel. I had forgotten about it, then a couple of weeks ago I watched a video on YouTube by Kelly Latevola who demonstrated the same technique. They both showed how to cover perfectly laid out die cuts with Glad Press ‘n Seal wrap*. The die cuts stick to the plastic and are then lifted up and moved to the card panel without getting the parts in disarray. I will link Laurie and Kelly’s videos below.
Challenges Entered
Simon Says Stamp Monday Challenge Show Us Your Metal at http://www.simonsaysstampblog.com/mondaychallenge/
Word Art Wednesday Challenge Anything Goes #226-227 at <a href=”http://www.wordartwednesday.blogspot.com/” rel=”nofollow”>www.wordartwednesday.blogspot.com/</a>
Instructions and Materials
This card base happened to be from a Recollections Kraft cards and envelopes package at Michael’s. When folded, the card measures 5½ X 4 inches.
A piece of Bazzill Madrid cardstock was cut to 5½ X 4 inches, then halved diagonally. It was then embossed with Lifestyle Crafts Dots Embossing Folder.
To make the dots on the bottom half of the card front, I placed the Simon Says Stamp Medium Dots Stencil over it and colored in the dots with TomBow Violet Dual Brush Pen. I would have preferred using the Large Dots Stencil but I don’t have it. I intend to order it soon.
Scrapbook Adhesive E-Z Runner Tape adhered the purple half to the Kraft card front.
Tim Holtz Walnut Stain Distress Ink was daubed around the edges of the card front.
Using a Cuttlebug and Simon Says Stamp Tattered Poppy Die, I die cut the flower petals with the sheet of Bazzill Basics Paper kraft foil cardstock that had dots. The stem and leaves with die cut out of Bazzill Gumdrop cardstock, the purple center with the Bazzill Madrid cardstock and the stamens were cut from The Foiled Cardstock Stack in gold by DCWV Inc.
Tim Holtz Walnut Stain Distress Ink was daubed around all the edges of the flower petals, stem, leaves and the purple center. Then I used a Tim Holtz Walnut Stain Distress Marker fine tip to draw a curved line forming an oval at the top of the purple flower center.
The Simon Says Stamp die Wishing was die cut using gold from The Foiled Cardstock Stack by DCWV Inc.
Tim Holtz Walnut Stain Distress Ink was daubed around the edge of the purple center. Then I used a Tim Holtz Walnut Stain Distress Marker fine tip to draw a curved line forming an oval at the top of the flower center.
All the pieces of the flower and the sentiment were adhered with Liquidex Matte Gel. It is similar to Ranger’s Multi Medium Matte and I found it to cost less. I buy it in a jar and use a small paint brush to put it in my small squeeze bottles. It was purchased in-store at Jo-Ann Fabrics. They frequently have a 50% off coupon.
Black Prismacolor Pencil was smudged, making shadows around the plant (not the top of the flower), the sentiment Wishing, and the line between the purple and dotted card front halves. The shadowing made especially the sentiment, Wishing, stand out better than it did without the shadowing.
I lined the stem and leaves with a Sanford Uni-ball Gel Impact Gold 1.0mm pen.
I think it was more work explaining how I made the card than it was actually making the card! 🙂 I hope this explanation makes sense to you and is easy to follow. If you have any questions, just leave a comment and I will get back with you. You’ll make my day if you LIKE this card and/or leave a happy note. Thank you for taking a look.
Have a glad day,
Tricia
*Note of Interest…
Jennifer McGuire’s husband, an engineer at Procter & Gamble, invented Glad Press ‘n Seal sealing wrap.
LINKS
Videos on moving die cuts with Glad Press ‘n Seal Wrap:
Laurie Willison
http://www.jennifermcguireink.com/2016/01/pressnseal.html
Kelly Latevola

This is wonderful… So delighted you linked your creation with us at Word Art Wednesday. I hope you join us again in our ongoing Challenge. I would love to encourage you with God’s Word from 1 John 2:17 which says, “The world and its desires pass away, but whoever does the will of God lives forever.” Have a wonderful week and God bless!
JO ANN
http://jatterburycreations.blogspot.com
LikeLiked by 1 person
What a profusion of pleasantly perfect polka dots! LOVE the way you used so many different dots, yet they blend together so nicely. I especially liked the way you added the metallic polka dots to the flower. It looks amazing! Great color platte, too! Thank you so much for sharing your talents with us for this week’s Simon Says Stamp Monday Challenge!
LikeLiked by 1 person