
The end of another school year is just around the corner, and parties are a great way to celebrate two months of homework-free bliss. All you need is a nice sunny day, some water balloons and sidewalk chalk, great food, good friends, and of course a piñata. They’re fun to make, to fill and destroy!
Materials
- large balloon
- paper towels and/or newspapers – torn into strips
- white glue
- egg carton
- masking tape
- paint and brushes
- small toys and candy
- pipe cleaner or wire
- string for hanging piñata
- stick

Instructions
1. Blow up a large balloon and tie a knot. I would recommend buying several of them, since they can easily burst when you blow them up…yes it happened. To add bumps to the exterior, attach egg carton sections and crumpled up balls of newspaper, with masking tape. I completely forgot to do this, and only realized my mistake once two layers of paper and glue had been added. Fortunately, it wasn’t too late, but did involve adding a few more layers of paper.

2. Paper mâché paste can be mixed in an old plastic container, and should be approximately 1/2 white glue to 1/2 water. Mix well, and begin dipping paper strips one at a time, making sure kids use their scissor fingers to remove any excess, before adding to the balloon. You can also use a wide paint brush to help flatten the pieces of paper onto the balloon.

Alternating between layers of newspaper and white paper towels (the folded kind) can make it easier to keep track of the layers that have been completed.
Aim for about four layers, making the final one in white paper towels, so the paint colours will be brighter when added on top. If you’re only using newspaper, you can cover the final layer with white paint first, to achieve the same results.

3. Allow to dry completely. This will take several days. Decorate with paint. We painted ours in blue, then drizzled old house paint on top.
Once the paint has dried, poke two holes near the top, and fish some wire or pipe cleaner through them to create a loop. Attach string to the loop for hanging. You’ll also need to cut a small hole using a utility knife, for adding the toys/candies inside. Once they’ve been added, you can add a layer of paper mâché and paint on top of that section to hide the cut, or you can leave it as is.
On party day, find a good place to suspend the piñata, and line up the kids to take turns hitting it, until all your lovely work gets destroyed!
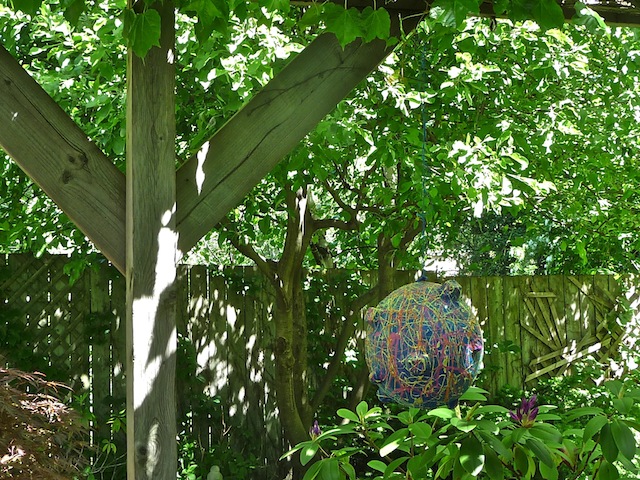


I love the shape of this piñata. Cannot understand why stores would sell them in the shape of a kitten for kids to slam with a stick! My grandkids would never want to do that! Also, creating your own, like this, makes economic sense too. The store prices are outrageous! Cute project for a cute end-of-summer party idea!
I never thought of that, but you’re so right. That’s horribly mean! There’s probably some sort of historical justification, but that doesn’t make it any nicer.
I love the pinata and the way you painted it! It looks like a satellite 🙂
Haha! Thanks Ana. It looks crazy, that’s for sure. Got a bit carried away with the drizzling.
How cute is that? It has been years since I made one of these. Thanks
for the great tutorial.
~Liz
Thanks Liz. It was a good ten years since I made one of these!
Awesome! Think I’m going to make one for my son’s birthday party. Found you over on Two Girls and a Party linky party.
Have fun!
This would be such a fun project to do with my 3 yr old 🙂 Love the way it turned out 🙂
Thank you! It’s a great project for even a 3 year old. What could be more fun than messing around with glue and paint, and not having to be the least bit precise about anything 🙂
You just brought back fun memories of pinata my mom made when I was younger. I’d love if you’d come and share at Inspire Us Thursday http://organized31.blogspot.com/2013/06/inspire-us-thursday-link-party-2.html
That’s wonderful! I remember making a pirate pinata years ago for my son’s birthday. It was in the winter, and was smashed to smithereens with the first hit. The cold had made the whole thing very brittle. Fortunately, there were enough goodies inside to appease the somewhat disappointed kids! Thanks for the invitation to your party.
What a great pinata tutorial. I made one just from cardboard and tape a few weeks ago and it proved a bit too strong for the kids – but they ahd fun ripping it apart after bashing it!!!!
http://www.thecraftyblogstalker.com/
We made homemade pinatas for my kids last birthday too, they made them in teams, swapped and bashed each others. It was so much fun and really kept them entertained. I love your paper mache version, I didn’t think of that
Love this – great instructions! When our kids were younger our neighbors and we took turns hosting a week of summer “camp” at each of our houses for summer break. We made pinatas (and a Mexican dinner) the week they were at our house, and everyone loved it. Maybe we’ll do it again this summer!
What a great idea to pair the pinata with Mexican food. I might just do that for our end of school get together! Thanks for visiting, Jennifer.
Pingback: Teach Me Tuesday #21 - Someday I'll Learn
Fancy that! So fun!!! Thank you for linking it up at http://www.finecraftguild.com/gratitude-party-70/
What a cool looking pinata! You always come up with such neat art projects!
Thanks for linking up to TGIF! Hope to see you again tomorrow =)
Thank you so much!
So fun and cool looking! Thank you for sharing at Sharing Saturday!
Hey there! Thanks for linking up such a cool craft. Stop by again next week and link up another awesome project!
Have a wonderful week!
Susie@bowdabra
http://bowdabrablog.com