

This stylin’ little iPod case was a special request by my youngest daughter, Ashton.
It started out as this:

Looks like a pile of garbage. Right? Wrong!! Scraps of fabric and cardboard turned stylish iPod case. Throw in some elastic and a bejeweled brad and TA DA!!
Inspired by this post I found on Pinterest by Come Together Kids, I decided to make a case for the new Acer tablet my daughter Peyton bought for herself. Click the picture to check out the tutorial on Come Together Kids.
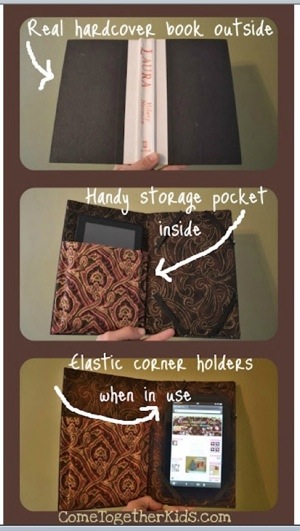
What a clever idea. What this post did for me was give me an ah ha moment. I knew I wouldn’t use an old book, or follow the tutorial (I don’t follow directions well), but I knew right then I would make Peyton a case for her tablet (something that otherwise might not have occurred to me). Thank you Laura at Come Together Kids, and thanks to everyone who shares projects on their blogs, Linky parties and Pinterest for spreading the creative inspiration.
Peyton’s case is still a work-in-progress. Since I eventually make more of my creations to sell, I want to make sure it’s durable, so I’m sewing the fabric cover, but I still have to work out how to finish it.
The other night, I had an epiphany; I decided to sew the fabric to the cardboard. It turns out the cover I made for Peyton’s tablet is too thick, but I grabbed a piece of a cardboard box and ran it through the sewing machine. IT WORKED (and put my creative mind in over-drive).
When I started the case for Pey’s tablet, Ashton asked if I’d make a case for her iPod. Perfect project to try out my cardboard sewing technique.
I grabbed some scraps of fabric, and a box (Girl Scout cookie case), and dove in.
1. Cut the cardboard to the desired size (slightly larger than the iPod), then bend to create a book cover. I used a ruler to mark the two places I wanted to bend the cardboard, then placed a book on the cardboard with the edge lined up with my marks and folded the cardboard up.

2. Cut two pieces of fabric about one inch longer and wider than the cardboard.
3. Lay the cardboard on the table with what will be the outside of the case (book) facing up. Spread tacky glue on the cardboard, and place the fabric right-side up on top of the cardboard. Smooth the fabric.

4. Flip the cardboard over, cut the corners at diagonals, fold all 4 sides of the fabric over and glue to the box making neat corners.

5. Fold the sides of the second piece of fabric and iron so the folded fabric covers the inside of the case/book when placed on top. Use Tacky glue to glue down so all edges are lined up.

6. Sew a straight stitch about 1/4 inch from the edge around the cardboard (I keep a quilting foot on my sewing machine since I often sew thicker or layered materials).


7. Sew elastic diagonally in the corners to hold the iPod. I used two pieces of elastic in opposite corners – that holds the iPod very secure.
Almost done…
Finally, I needed something to hold the case closed. I thought about attaching ribbon to tie or velcro the case closed, but to make it look neat, I needed to glue the ribbon to the inside of the case before the fabric. Too late for that. I needed something I had on-hand…. What I settled on was a bejeweled brad (found in the scrapbook section of Hobby Lobby), and thick elastic cord (kept from broken tent poles – more saved junk put to use).
I poked a hole through the cover of the case, put the brad through and bent the prongs. I made sure that there was space between the brad and the cover for my elastic cord..


I glued a piece of felt over the bent prongs to help keep the brad secure,

and sewed the elastic cord inside the back cover and IT’S FINISHED!! YAY!!
I think the turned out so cute!! Now my imagination is going wild. There are SO many possibilities….
Thanks for checking this out. I’d love it if you’d pin it!!
Tammy


Click here to see a list of the fabulous linky parties I may join.
Monday Link Up Party @ Making the World Cuter
Metamorphosis Monday @ Between Naps on the Porch
Wednesday Adorned From Above Link Party @ Adorned From Above
Penny Pinching Party @ Thrifty Home
What I Love Wednesday @ Lollipops
Wow us Wednesday @ Savvy Southern Style


Sewing on cardboard, never would’ve thought and yet, worked great! Such a clever idea!
Thanks Jeannie – I’m finding all kinds of fun cardboard sewing projects now.
WOW! Great job… soo cute too!!
Thank you so much for joining us in Thursdays Favorite Things Blog Hop! With His grace, wishing you peace and many blessings to you and yours… Carla
Thanks Carla!!
This iPod cover looks great! We’d love to include it as a how-to on CraftFoxes.com. Interested? Feel free to email me at bethany@craftfoxes.com.
Thanks Bethany – I’d love to be included on CraftFoxes.com
Wonderful tutorial, you’ve put so much work into this. Glad I hopped by from Katherine’s corner I’ve enjoyed this post very much. TFS
Thanks Chris!
That is too thrifty and cute!
Alishia – I’m all about being thrifty, especially when it means using something that may otherwise be thrown out. Thanks for the comment.
I have Pin’d this. Thank you so much for the tutorial!
Thanks Jamie!
Love this! My daughter has an ipod nano, so I’d have to make it smaller, but she would love it, especially the zebra print!
If you make a little one for a Nano – I’d love to see pics!
That is really cute. Great idea using cardboard too.
Visiting from Sew Darn Crafty Link up,
Nikell
Thanks Nikell – I’m having a great time coming up with more cardboard projects.
Wonderful tutorial. I love the fun fabric choice too. Thank you for your bloggy friendship and for sharing at the Thursday Favorite Things hop xo
Thanks for joining us this week at the Creative Bloggers’ Party & Hop 🙂
I love your party!!
That is awesome! Great idea and looks great, too! Visiting from the party at Homemaker on a Dime!
Thanks.
This case is too cute! I especially love the fabric!:) I’ve made some iPod pouches too, and I love them!:) Come check them out if you like!:) http://fancythatnotion.blogspot.com/2012/06/diy-lace-bow-tutorial.html , http://fancythatnotion.blogspot.com/2012/06/button-pouch.html
I love the button pouch!! I can think of a million things I can make these for in varrying sizes. Thanks!!
I am going to have do this for my Kindle. Thanks for the tutorial!!!
Thanks Allison. I’d love to see pics when your done!!
What a great idea. I love the zebra print by the way! Thanks for sharing.
that is really a nice case, i’ve posted several of these already, however i like the clever idea of the cardboard. thank you
I’ve been thinking about doing sth like this. Look great!
Great tutorial! Love the zebra stripes with the green phone too, perfect! Thanks so much for sharing on Craft Schooling Sunday!
This is such an awesome idea. Your post is so inspirational. I would love it if you could share this wonderful post at our WIW linky party. I hope you can join us.
Paula
ivyandelephants.blogspot.com
Thanks for sharing over at Craft Junkie Too ….this project is part of our featured favorites this week. 🙂 Stop by and check it out and link up more goodness. Also, you can grab the featured me button for your blog if you’d like.
Hugs,
Tracy
http://www.craftjunkietoo.com/2012/08/tgif-linky-party-61.html
Pingback: Lovely Crafty Weekend #85
GREAT tutorial!!! Love how the case turned out!
Thanks so much for sharing this at The DIY Dreamer.. From Dream To Reality!
This is sooo stinking adorable.. love the pattern.. and what a great way to be a wonderful Girl Scout by reusing your cookie box! Thanks so much for sharing with the Pink Hippo party!
xoxo
Amie @ Pinkapotamus
So cute!
Thanks so much for linking up at I Gotta Create! ❤ Christina
Wow, really cool. And a great tutorial too!
what a cute project. I am totally pinning this. thanks for sharing!
Hugs,
Lelanie
Thank you!!
Pingback: Creative Juice Thursday {features & link-up}