
I almost fall nearly everyday, and my dog had slipped around on it as well.

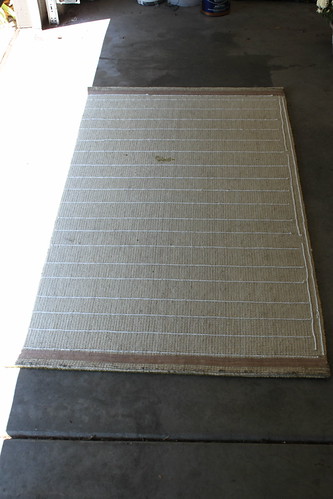
The heavy weight of the jute means it lays flat 100% of the time. I move the rug into the position below for effect so you can see how we trip and slide on a daily basis. I thought this was a better option than staging a fall and trying to photograph it.

In an effort to keep us safe, I decided to slip proof the rug. Now, I could have gone with a rug pad, but in my opinion, they rarely work on tile. The rubber pad just tends to slip around with the rug. So I went with a different, cheaper option.
Step 1:
Collect your supplies…
- Silicone based Caulking
- Caulking Gun
- A piece of wood (to help make straight lines. I didn’t end up using this because I was able to follow the lines in weave in the rug, but if you have a finer weave then you made need the wood or a level)

Step 2:
Lay out the rug, face side down. I was doing this in the garage (away from my shedding dog) so I laid it near the door to help speed the drying time. This would be a great time to either sweep or vacuum the rug. You want it as clean as possible to help the caulking adhere.

Step 3:
Apply a beaded line of caulking around the edge of the rug.


After you finish the edges, apply lines of caulking every few inches across the length of the rug.
You can go back and fill any empty spaces with extra caulking at this point.

Step 4:
Let the caulking dry completely before bringing the rug back inside. I let it sit for several hours even though the caulking felt dry after about 1 hour.

After the caulking is dry, you can bring the rug back inside.
I was going to take a new picture of the rug after it was finished, but it looks exactly the same as it did before. By the way, my dog totally hijacked this shot. As soon as I raised the camera he walked to the rug and sat down.
But when I actually want to take a picture of him, he makes me chase him all over the house and won’t sit still. Lil Butthead.
Now, I will say that this rug will not feel slip proof, unless you are standing on it. If you are not standing on the rug, then it is easy to slide around, in case you need to move it. However, if you are standing on the rug, it won’t move much, your body weight will work with the caulking to make it very slip proof resistant.
Project Cost Breakdown:
1 Container Caulking = $2
Rug (Already Owned)= $0
Caulking Gun/Paper Towels/Wood or Level (Already Owned) = $0
Total Project Cost: $2
SHOWING THE LOVE!!
Linking To: Polly Want A Crafter, Between Naps on the Porch, Craft-O-Maniac, The Girl Creative, Making the World Cuter, Today’s Creative, Not JUST A Housewife, Sweet Little Gals, Ginger Snap Crafts, Blue Cricket Design, Very Merry Vintage Style, We Are THAT Family, Savvy Southern Style, Beyond the Picket Fence, The Artsy Girl Connection, The Shabby Creek Cottage, The Not So Functional Housewife, French Country Cottage, The Shabby Nest, Addicted 2 Decorating, Remodelaholic, The Crafty Nest

This is helpful! I also love the rug…. and your dog is pretty cute too 🙂 Thanks so much for sharing.
Would LOVE it if you would link this up at my turquoise lovin’ party going on right now!! http://www.sweetlittlegals.com/2011/10/turquoise-lovin-8.html
Thanks for sharing the tip.
What a great idea! I’m going to have to remember this one.
Such a great idea! I would have never thought of doing that. I love the rug, BTW!
I would love for you to stop by and link up your tip for Functional Friday.
~Angela
The Not So Functional Housewife
http://thenotsofunctionalhousewife.com
I need this for my kitchen rug, thanks! Thanks for linking up at Beyond the Picket Fence.
This is an awesome idea! Thanks for sharing:)
Excellent idea, glad it worked! Have to keep this in mind. Love your dog. We have a chocolate lab named Molly (Brown, lol) and she is quirky about picture taking. Unless there is food involved, then she is very cooperative!
Same here! Baxter will do anything for a treat 🙂
Great tutorial….it made me think of this post I did about using an old yoga mat for creating a slip proof rug myself….not as perfect as yours….but it works…. here is the link
http://sweetwaterstyle.blogspot.com/2011/08/recycle-your-yoga-mat-make-rug.html
see what you think 🙂
Good idea…thoughts about it on stair treads?
The basic caulking provides enough traction on the floor, but I don’t know that I would use it on stair treads. Perhaps if you used a thicker silicone based caulking it would provide enough traction, but be sure to really test it out to make sure it stays put.
Love the rug … and it’s one of my favorite colors! I’ve had this same problem with just about every throw rug I’ve had. With two Rotti’s, I’m forever straightening them out. Now, I use my electric glue gun and put a big glob (technical word!) of hot glue in each corner on the back. Let it set up, and then flip it over. When it’s ‘set’, the glue won’t stick to the floor, but the waxy material will keep it from sliding! Hope this helps!!
P.S. Works on picture frames that are always lopsided, too!
I agree! This is a great idea. I used to work as a framer and we would suggest this for our customers.
I love your dog! I have one just as cute! You can see him here: http://the236.net/2011/09/28/welcome-fall/
This is such a great trick. I have two rugs on my tiled foyer that need to have some silicone on the back!
Michelle (@The236)
What a great idea!
super duper idea. thanks for sharing.
Pingback: I’m Feeling Inspired – Fireplace Inspiration | Changing My Destiny
Pingback: Project Recap – October | Changing My Destiny
Pingback: Addicts (not so) Anonymous Link Party No. 28
Pingback: 2011 Recap | Changing My Destiny
Pingback: {Do Something Crafty} #10
Would this work on wood floors? Without messing them up?
Will the silicone (after it’s dried) ruin hard wood flooring? anyone try this on wood floors?
Yep. I have two dogs that like to rearrange my kitchen rugs. 🙂
Can you wash the rug with caulking on it down the road if it needs to be??
I’ve found a similar product that produces even better results. It’s fast easy and works so well. It’s called GripCote, It waterproofs, doesn’t rub off and I can pick it right up and move it anywhere. I can’t believe nobody knows about this product from LiquiGuard.com
This tip was also posted on apartment therapy. Someone commented that it did damage their wood floors, with dark streaks.