A Garden of Thanks (#GDP027)
03/14/2016
Happy Monday!
It's been a hectic couple of weeks ending with three stamp club meetings over the weekend. Now it's time for the paperwork and the clean up. The nice thing about that is while I'm cleaning up I can focus in on the fun stuff that happened during the meetings and it makes the process a whole lot more fun.
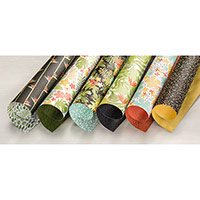
A tropical look is always a favorite with me considering where I live and the abundant color surrounding me year round. My favorite tropical plants are plumeria (frangipani) and hibiscus in all their color varieties. So when I saw the Botanical Gardens Bundle in the Occasions Catalog, it was the very first thing on my Wish List. Today's post features one of the projects I designed for the weekend's stamp club meetings using the Botanical Gardens Bundle and a coordinating item from the Sale-A-Bration Brochure, the Botanical Gardens Designer Vellum Stack. (You saw the other two projects in this post and this post last week.) This project also fits the Theme Challenge at Global Design Project (GDP027) for a Thank You project.
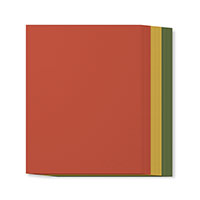
This card begins with a card base of Mossy Meadow cardstock. A piece of vellum from the Botanical Gardens Designer Vellum Stack was cut to 4-1/4" x 5-1/2" to cover the card front and attached with a strip of adhesive placed approximately 1/2" from the left edge of the card front. A piece of Cajun Craze cardstock was placed vertically near the left edge of the vellum with the left edge of the cardstock approximately 1/8" from the left edge of the vellum. A strip of Botanical Gardens Designer Series Paper was adhered at the center of the Cajun Craze cardstock. Note that the top and bottom edges of the Designer Series Paper and Cajun Craze cardstock are flush with the top and bottom edges of the card front and vellum.
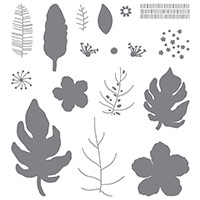
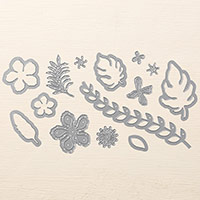
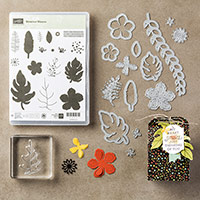
Scraps of Mossy Meadow and Old Olive cardstock were stamped with the three largest leaf vein images from the Botanical Blooms stamp set using the ink color for that piece of cardstock and die cut with the Big Shot using the corresponding framelit from the Botanical Builder Framelits. A scrap piece of Old Olive cardstock was used to die cut the fern thinlit (using the Precision Base Plate along with the Magnetic Platform). The leaves were adhered near the lower left corner of the card front using Mini Glue Dots at the stems of the smaller leaves and an additional Mini Glue Dot under the largest leaf. Since my largest leaf extends over the vellum, I lifted the vellum up and placed a Mini Glue Dot in between the vellum and the card front under that leaf to keep the vellum from flapping too much from the weight of the items that would be adhered to the card front.
Scraps of Cajun Craze, Mint Macaron, and Hello Honey cardstock were used to die cut the three flowers. The Cajun Craze and Mint Macaron were die cut with the large and small five petal flower framelits and the Hello Honey was die cut with the double five-petal thinlit (using the Precision Base Plate with the Magnetic Platform). Cajun Craze ink was used to add flower centers to the three flowers and all of the flower petals were gently curled with the bone folder. The three flowers were adhered to the card front over the leaves using Mini Glue Dots.
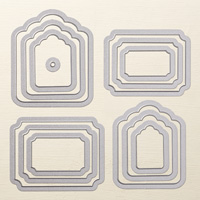
A final scrap of Hello Honey cardstock was stamped with the "thanks For Being You" sentiment from the Suite Sayings stamp set using Cajun Craze ink and die cut with the Big Shot using the Tags & Labels Framelits. The greeting was adhered near the upper right corner of the vellum using Stampin' Dimensionals. A Mini Glue Dot was placed between the vellum and the card front underneath the greeting to help keep the vellum from flapping with the weight of the greeting.
The inside sentiment area of the card was lined with a piece of Whisper White cardstock. It's very difficult (impossible) to see in this photo, but there's a piece of Botanical Gardens Designer Vellum adhered across the bottom 1-1/4" of the liner. This time, the adhesive used was Xyron making the strip of vellum a sticker. This was done because a strip of adhesive or Mini Glue Dot would be visible through the vellum; however, covering the entire back of the vellum with Xyron adhesive (I used the "X" Xyron dispenser) solves the problem of how to hide the adhesive. A strip of Botanical Gardens Designer Series Paper covers the top edge of the vellum and brings all the vivid color from the card front to the inside.
The border stamp from Botanical Blooms was inked with Old Olive ink and stamped along the left front edge of the Medium Whisper White envelope. Three Hello Honey flowers were added near the lower left corner by stamping off the ink on a scrap of paper before stamping the smallest five petal flower on the front of the envelope. The flower centers were stamped with Cajun Craze ink. The solid leaf images were stamped on a scrap piece of paper before stamping on the front of the envelope and then the leaf veins were stamped over the solid leaves using "full strength" Old Olive ink.
My stamp club members were a bit hesitant when they saw this card thinking that it was going to be a difficult project. They were certainly pleased to find out that the Big Shot did the lion's share of the work and they got to have the fun of figuring out how they were going to place their flowers on their card front. I just love it when a plan comes together.
Supplies I used for this card --
Stamps: Botanical Blooms, Suite Sayings; Inks: Cajun Craze, Hello Honey, Mossy Meadow, Old Olive; Cardstock: Cajun Craze, Hello Honey, Mossy Meadow, Old Olive; Designer Series Paper: Botanical Gardens, Botanical Gardens Designer Vellum Stack; Adhesives: Fast Fuse, Mini Glue Dots, Stampin' Dimensionals, Xyron "X" (non-Stampin' Up!); Tools: Stampin' Trimmer, Simply Scored Scoring Tool, Bone Folder, Paper Snips, Big Shot w/Standard Cutting Plates, Magnetic Platform, Precision Base Plate, Botanical Builder Framelits, Tags & Labels Framelits; Other: Medium Whisper White Envelope

Very fun card. Love the flowers overlapping the vellum. Thanks for sharing dimensions--I sure want to CAS this one!
Posted by: Susan K | 03/15/2016 at 06:24 PM
A lovely tropical card Mickey! I bet your stamp club members all loved making it as well. Thanks for sharing your talents and joining in with this week's Global Design Project challenge!
Posted by: Jess Williams | 03/15/2016 at 08:19 PM
When I look at your card, I feel like I am in a tropic paradise. Thanks for sharing this super beautiful card with us.
Thank´s for playing with us.
Vielen Dank, daß Du bei uns mitgemacht hast.
Hugs / LG Tanja
Posted by: Tanja Kolar | 03/16/2016 at 07:45 AM
Mickey - this card is wonderful! I love how you've used the dies to create a wonderful arrangement of flowers, but that vellum is perfect here. Thank you so much for playing along with this week's "thank you" theme at Global Design Project.
Posted by: Brian King | 03/18/2016 at 08:42 AM
Hello my dear, dear friend, Mickey! I am so excited to see your beautiful card. Thanks for joining us this week at Global Design Project. XOXO
Posted by: Connie Collins | 03/20/2016 at 04:05 PM
Great project - I love a stamped inside and matching envelope! Thank-you for playing along with the Global Design Project!!
Posted by: krista frattin | 03/24/2016 at 06:00 PM