One of the glories of spring – watching those little green bits poke out of the soil, transforming from a hard little pebble into something that may well be able to feed you. Miraculous. Especially when it works. In the past I have not had good luck with starting from seed and it took lots of reading for me to realize that I am not alone. Most gardening guides tell you right off the bat that starting from seed, while potentially rewarding and money-saving, can be very frustrating. In the past I have started seeds, used the few plants that worked out, and bought seedlings for the rest. I have, however, made minor adjustments over the years and for the first time – and I am reluctant to say anything and jinx the outcome – I seem to be growing several plants that might actually survive this process. So I thought I’d share what I’ve learned with you while there’s still time – especially for those of you to the north. Frankly with the way the weather has been, I’m inclined to dispense with my normal planting calendar altogether and just start whatever I want whenever it occurs to me.
For me, seedling success seems to depend most on 4 variables.
1) Temperature. For the last two years I have used heat with my seedlings and it has made an enormous difference in the number of seeds that germinate and the amount of time that it takes for them to start. I personally use a heating pad (which I imagine is NOT recommended by heating pad manufacturers and is certainly NOT recommended by seed heater manufacturers 😉 ) and if it is especially chilly I also put a space heater next to the seedling rack. My understanding is that most seeds need at least 70 degrees to germinate. I feel the trays and if they are mildly warm NOT HOT I go with that.
2) Moisture. Seeds need water to germinate. Seed starting trays often include a plastic dome for cover and this helps retain moisture and heat, makes a nice little hothouse to help your seeds along. I use these domes, but have found that the trick is to make sure not to keep the dome over seedlings that have emerged. The infant seedlings still want moisture, but not as much as seeds, and they don’t especially like a lot of water from the top. I’ve been careful this year to remove seedlings that have emerged from the germination tray once they are truly out of the soil and placed them in a tray that is not covered to keep them from constantly being rained on from the plastic dome. Because I like to be able to move them easily I prefer cardboard cells or toilet paper rolls cut in half to plant in rather than the rows of plastic cells.
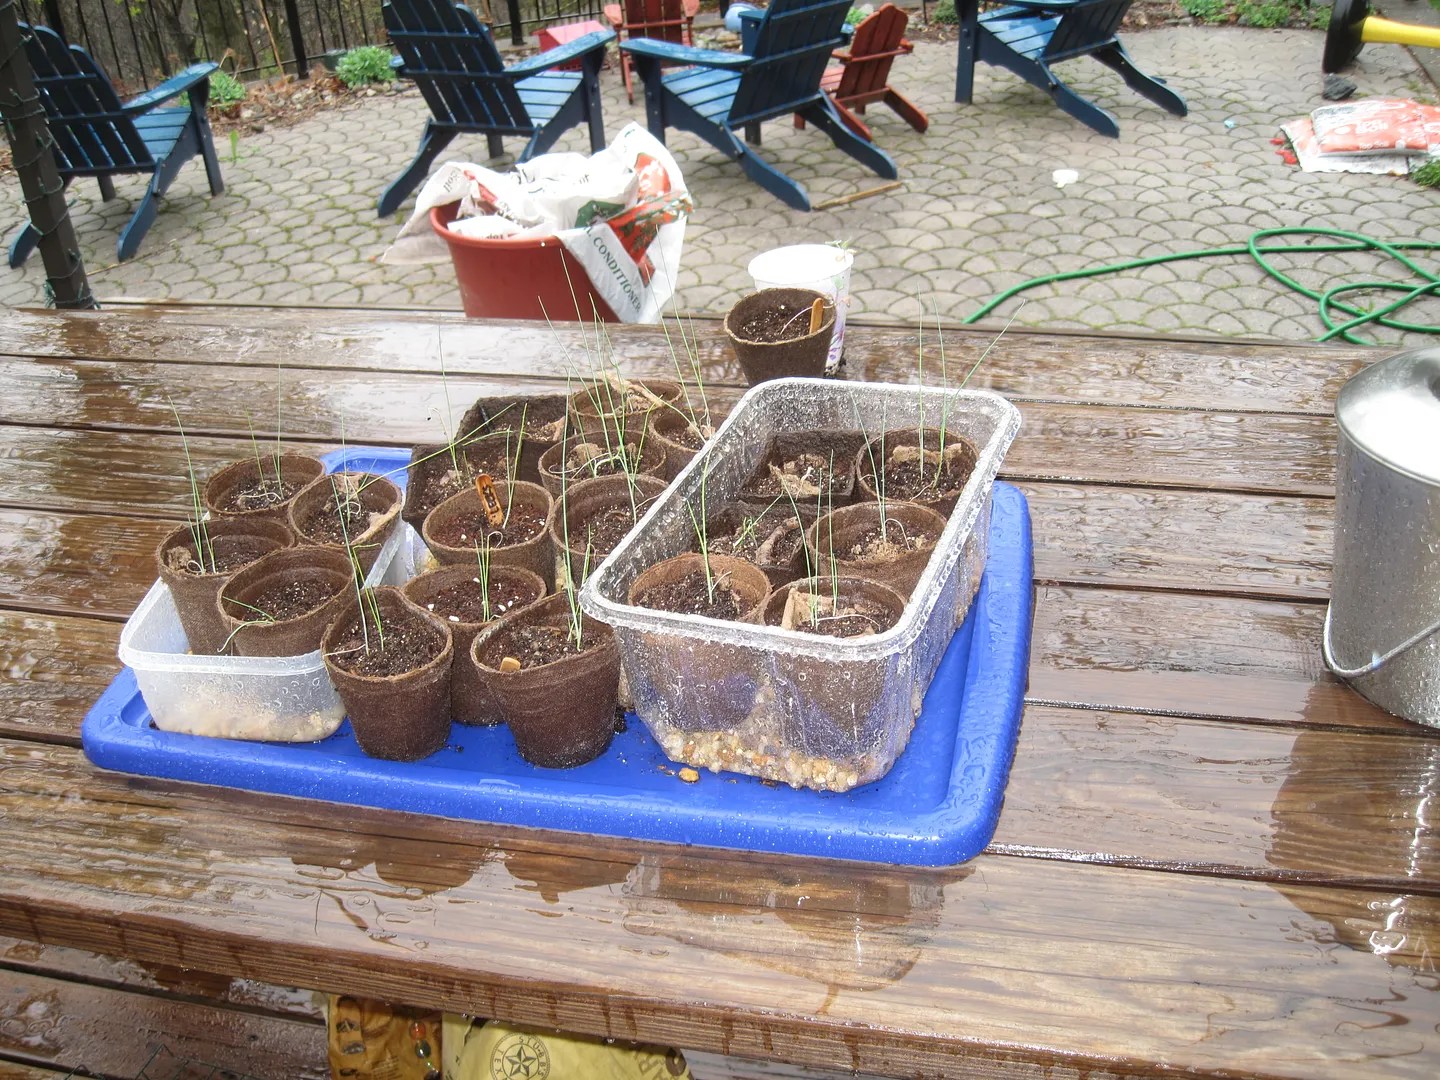
I’ve tried something new this year that has proven quite effective in helping me regulate moisture levels for my seedlings. Pea gravel. Pardon the blurry image – what I’m trying to show is the gravel in the middle of the seed tray here. I scooped some pea gravel into the bottom of the tray and then placed the seed starting cups on top of the gravel. This allows me to pour water UNDER the seed starting cups. They drink it up from the bottom while sitting on the gravel; they are not as likely to develop problems associated with over-watering or water overwhelming the seedlings. The pea gravel also holds onto a bit of moisture and slowly delivers some moisture to the plants through contact. If I am remiss in watering, the effect does not seem to be as devastating. If I overwater (something I tend to do), the damage seems mitigated. I will be using pea gravel again. It is important to note that I DO have a plastic tray under all of this mess that I tested for holes. A drippy seed starting tray is not fun, and can be crazy dangerous if you follow my next suggestion…
3) Light. In years past I simply set up some shelves in front of a sliding glass door that was as south-easterly as I could provide and had very sad looking little seedlings. Pale, leggy to the point of collapse. NO GOOD. I did some research online and found that there were plenty of gadgets available to help me provide light to me little veggie children and all I had to do was plunk down a load of cash and I too could experience seed starting victory. Well, I pretty much vow not to start from seed every year, so the investment that they were asking for was pretty much out of the question. More research from the DIY pages revealed that florescent shoplites can deliver adequate seedling sun. That sealed it. I had a wire shelf unit already (scored from a big box store on super sale, so I think it was like $15). I went to the hardware store. An employee offered to help and I explained my dismay that I couldn’t seem to get enough light in a VERY SUNNY glass door. He expressed a theory that newer windows and glass doors may block out some of the magic that seedlings require because of their coatings and insulation. He said something along the lines of “I’m no scientist, but folks with old windows seem to have better luck no matter which direction they’re facing.” He then helped me choose 4 foot shoplites and T-12 bulbs. I rigged the lights, added a heating pad, threw on a full spectrum light I had from when I lived somewhere it rained ALL THE TIME and voila, instant sunny spot for seedlings.
Lights Off.
Let the sunshine on.
4) Transplanting. Great, so you’ve got some healthy green little buggers in those cells and it is so exciting so you just wait until the right date, right? No. You will need to take them out of those little jobbies and put them in slightly larger containers to allow their roots room to grow. Yes, you really need to do this. I usually do it when the seedling has begun to develop it’s second set of leaves. This is another time I am glad to use cardboard. It is MUCH easier to get them out of the cardboard then plastic, in my experience. So, gently move them into larger containers, and a week before the proper date for outside I start putting them outside for a few hours a day, slowly building up the amount of time to get them accustomed to the harsher conditions that may be out there waiting for them.
Leeks getting ready for the garden. Go, leeks, go – you expensive, delicious little freaks!
I’ll keep you posted as to how many of my little beauties actually make it into the soil. Here’s hoping my experiments will pay off for you!
I have found that a waterbed heater works wonders for germinating seeds. The heater comes with a thermostat and sensor. Put the heater on a shelf; place your trays on a 2×4 or bricks at 2 inches above the heater. Place the sensor in the soil of the middle tray. Set at 70. Set up lights. Works! Be sure to get the heater with the digital thermostat.
Thanks for the tip Scott. I never would have thought of it.
These are great tips! Each year I try new things to help my garden flourish better; I’m only a 2nd year home gardener. These tips will definitely help me get a good start this year!
Great advise! You look well on your way to a good growing season. I did a post about starting seed on Tuesday and would you believe all my seeds have germinated but three in less than a week. They are now under a shop light in my tub. Hopefully, we will both have a bountiful season.
Loved the photos of your gorgeous bathtub with seedling tray on top. I also have purple cherokee tomatoes coming up – fabulous tomato. I’m posting my bathtub version of seedling care today!
You’ve got some great tips here. I have a party going on called Saturday Spotlight, and I’d love for you to drop by and share this or any of your other great ideas!
Have you started your seeds? I’ve decided to ignore most of the available wisdom this year and have started 3 weeks earlier in an effort to beat the early heat we had last year. I imagine this will turn out to be some kind of mistake, but I have to play the odds somehow, and if I can lean in the direction of a longer growing season, I’m in! I thought I’d reblog my tips on starting seeds from last year in case you’re considering diving in and would like to have some success right off the bat rather than wandering in the intuitive wilderness as I did. 😉 Spring is coming – get your fingers in some dirt and get yourself some veggies!
I’m experimenting with more indoor growing this year too. I sort of feel like with all the wild weather, all bets are off. Conventional wisdom is just asking to be set aside…. we’ll see. I’m hedging my bets by planting plenty so I can replace the ones that get knocked off when it’s too cold instead of too hot THIS spring. 😉
i remember your seed starting last year. this year we have a really bright window – i’m going to go the opposite way and do as much direct planting as possible. But I did already start some tomatoes, eggplants, petunias, ammi, and platycodon and they are all popping out of their casings beautifully in the window! No more ghetto set ups for me and huge failures haha. Wish I were handy enough to make your shelving! Much luck this year! – Vivian
ooooh i’m so crossing my fingers for you!!! i’ve had both good and bad luck with seeds. i think living in the pacific northwest made it quite easy for some things to grow and not so easy for others. i’ve taken to buying my tomatoes as starters from a local farmer but everything else i try to do myself. i also use a heating pad – but one that’s MADE for seed starting haha… and a light from home depot. i did find though the first time i used it that the seeds shot out like rockets, aiming for the light. they got tall and spindly and then fell over and died. not sure what happened there.
good luck to you!
thank you for sharing with us at the wednesday fresh foods link up! i hope to see you again this week with more seasonal & real/whole food posts! xo, kristy.
Well…. I caved and bought an actual seedling mat – in part because there was one right in my face at the garden center, and in part because I needed my heating pad. 🙂
It really did take me a few years to have success. Some folks seem to be able to just throw the seeds in some cups with some dirt and that does it, but I have a feeling there’s more to that than meets the eye. 😉 Thanks for stopping by Christine!
I’ve used lights just like yours, only suspended over a workbench, and had great luck starting both vegetable and flower seeds. Thanks for the reminders in this post!
The lights have made more of a difference than anything else I’ve added. If we ever get a workbench area set up (and clean – haha), maybe I’ll put the whole operation there. Thanks for stopping by Mary Ann!
This was & is a really good post! i also stated my seedlings from february the 17th. I have sown radishes, green & other lettuces, green courgettes, pumpkin seeds & cucumber seeds. Thanks for the extra & useful tips too! Good luck with it all!
I found you through TGP. This is a great post! I agree with almost everything you said. I teach beginning gardening to people who want to start victory gardens and I have found that the seed starting really trips people up. Hardening off is so key!
Thanks Shannan! I wish I’d had someone like you to help get me over the initial hump. The whole seed thing can be very discouraging, but so rewarding when it works out. Thanks for stopping by!
It’s so wintery here still that I really haven’t thought about starting anything, but I guess all that much more reason to get going on it, since there will be less outside time for my plants! I like to grow herbs in the summer because they’re generally easy and it’s so much better then buying a bunch of stuff that you usually just throw away (parsley!!)
I so agree on the herb front – although I have TERRIBLE luck growing herbs from seed. Usually can get some thyme and rosemary going, but the parsley always craps out on me – I think I’ll get some seedlings as I agree with you – buying bunches is usually such a waste…
I could leave an endless, gardener-geeky comment here but I’ll try to control myself… I sooo get your seed-starting pain. Ironically, the first three or four years that I started seeds, I had phenomenal success. Almost everything I planted came up…and most of my plants weren’t too leggy. My worst problem was that most plants got too big and sometimes became rootbound before I could transplant! I started strawberries from seed (little cream colored French berries), foxglove, salvias, amazing and unusual annuals and perennials whose names I’m not remembering…eggplants, every herb under the sun—including lavender, endless tomatos…I even successfully started a Japanese maple cutting and various rose cuttings. Etc, etc. Sheer gardening bliss. And then…we built a new house. Where I found not quite as much success starting seeds… but not too bad. I wondered why I’d been so successful before, as a gardening newbie… and figured it was just beginner’s luck. But I was happy to get at least a few plants from my many seeds, though now I was using a warmer and lights to try to ooomph my success. If I didn’t deadhead in my garden too religiously, I’d get volunteers, which helped offset the poor seed starting. And then…we built another new house. And my seed-starting attempts were soooo sad. Like…almost nothing made it. It didn’t occur to me that our new ultra-violet blocking windows might have something to do with it! I thought it was just one more reason to be homesick for my former home. So maybe next year, I’ll try it again with lights and shelves in the garage. It’s a little late to start anything other than super fast growing annuals inside now…
So fun to happen upon your blog. A fellow gardener. Yay!
Thanks for sharing your story Lynaea. Weird how our super awesome windows are mucking up the garden, eh? Would love to hear if you have better luck in the garage. So delighted you found us! Good luck with your garden!
Thanks for sharing on Mostly Homemade Mondays! Just to let you know, I am featuring THIS POST as my “Featured Post” – Congratulations! Hop over to the blog tomorrow to grab my button to display on your blog.
I so want to start plants from seeds, but I feel intimidated by a lack of space and light. I pinned this because your tips are so clear. Maybe I’ll figure out a way to do it.
It is that time of year to start thinking about are seeds and starting them!! Thanks for sharing!! Hey I would love it if you stopped by and shared your stuff on My 2 Favorite Things on Thursday – Link Party…it’s going on now!! I would love to have you!! http://www.cookinandcraftin.com/my-2-favorite-things-on-thursday-link-party-6/
Hello beautiful! Great post. I need to try this. Pinned and tweeted. Thank you for being a part of our party and we hope to see you on Monday at 7 pm. We can’t wait to party with you! Happy Valentines’ Day! Lou Lou Girls
Great tips. I just planted my seeds last weekend…I know, little late. My husband built me a greenhouse film over the garden so at least I can transplant them earlier. But, why didn’t I think of planting leeks? They are my favorite, lol!… I’m so glad you linked it with us at Thursday Favorite Things!
I am way, way behind with my garden this year and should have started seeds a few weeks ago. Guess it’s transplants for me this year!
Thank you for sharing these tips!
These are some great tips, I wish I have a green thumb, but I am terrible when it comes to plants 😦 Thank you for joining us at the Oh My Heartsie Girl Wordless Wednesday! I look forward to seeing you again next week!
Thru trial and error last year I did most of what you have done with 2 exceptions. First I use the larger size pot to begin with because I don’t do a massive amount of plants and it saves me from transplanting them. I just use potting soil and make a hole where I put the seed and fill that with seed starter soil. And second I am sooo using your gravel idea! Thanks for the tip!


 I’m trying to show is the gravel in the middle of the seed tray here. I scooped some pea gravel into the bottom of the tray and then placed the seed starting cups on top of the gravel. This allows me to pour water UNDER the seed starting cups. They drink it up from the bottom while sitting on the gravel; they are not as likely to develop problems associated with over-watering or water overwhelming the seedlings. The pea gravel also holds onto a bit of moisture and slowly delivers some moisture to the plants through contact. If I am remiss in watering, the effect does not seem to be as devastating. If I overwater (something I tend to do), the damage seems mitigated. I will be using pea gravel again. It is important to note that I DO have a plastic tray under all of this mess that I tested for holes. A drippy seed starting tray is not fun, and can be crazy dangerous if you follow my next suggestion…


I skipped the transplanting part on some melon and eggplant seedlings this time – we’ll see if they make it!
Oooh, be sure to let me know. I’ve had so little success in the past that I am reluctant to skip ANYTHING this year. But I DO love to save steps. 🙂
I have found that a waterbed heater works wonders for germinating seeds. The heater comes with a thermostat and sensor. Put the heater on a shelf; place your trays on a 2×4 or bricks at 2 inches above the heater. Place the sensor in the soil of the middle tray. Set at 70. Set up lights. Works! Be sure to get the heater with the digital thermostat.
Thanks for the tip Scott. I never would have thought of it.
These are great tips! Each year I try new things to help my garden flourish better; I’m only a 2nd year home gardener. These tips will definitely help me get a good start this year!
Great advise! You look well on your way to a good growing season. I did a post about starting seed on Tuesday and would you believe all my seeds have germinated but three in less than a week. They are now under a shop light in my tub. Hopefully, we will both have a bountiful season.
Oh how I would love to claim the tub for gardening! Spring is so exciting!
Loved the photos of your gorgeous bathtub with seedling tray on top. I also have purple cherokee tomatoes coming up – fabulous tomato. I’m posting my bathtub version of seedling care today!
It is working out so well.
Some really great tips. I had a lovely vegetable garden at our old house and I’m hoping to have one again one day.
Visiting via motivate me Monday at keeping it simple
I hope you will come visit and follow my blog
Leigh
http://www.thesewingdivaandherreluctantmodels.blogspot.co.uk/
Thanks for stopping by Leigh! We’ll check it out!
You’ve got some great tips here. I have a party going on called Saturday Spotlight, and I’d love for you to drop by and share this or any of your other great ideas!
http://angelshomestead.com/saturday-spotlight-3/
Thanks for the invite April – we’ll check it out!
Reblogged this on my sister's pantry and commented:
Have you started your seeds? I’ve decided to ignore most of the available wisdom this year and have started 3 weeks earlier in an effort to beat the early heat we had last year. I imagine this will turn out to be some kind of mistake, but I have to play the odds somehow, and if I can lean in the direction of a longer growing season, I’m in! I thought I’d reblog my tips on starting seeds from last year in case you’re considering diving in and would like to have some success right off the bat rather than wandering in the intuitive wilderness as I did. 😉 Spring is coming – get your fingers in some dirt and get yourself some veggies!
I am itching to get started but in Colorado we do not have a long growing season. I may start some lettuce for my window….
I’m experimenting with more indoor growing this year too. I sort of feel like with all the wild weather, all bets are off. Conventional wisdom is just asking to be set aside…. we’ll see. I’m hedging my bets by planting plenty so I can replace the ones that get knocked off when it’s too cold instead of too hot THIS spring. 😉
i remember your seed starting last year. this year we have a really bright window – i’m going to go the opposite way and do as much direct planting as possible. But I did already start some tomatoes, eggplants, petunias, ammi, and platycodon and they are all popping out of their casings beautifully in the window! No more ghetto set ups for me and huge failures haha. Wish I were handy enough to make your shelving! Much luck this year! – Vivian
Hey, if you’ve got a window that works, who needs shelving?! Keep me posted on those seedlings!
ooooh i’m so crossing my fingers for you!!! i’ve had both good and bad luck with seeds. i think living in the pacific northwest made it quite easy for some things to grow and not so easy for others. i’ve taken to buying my tomatoes as starters from a local farmer but everything else i try to do myself. i also use a heating pad – but one that’s MADE for seed starting haha… and a light from home depot. i did find though the first time i used it that the seeds shot out like rockets, aiming for the light. they got tall and spindly and then fell over and died. not sure what happened there.
good luck to you!
thank you for sharing with us at the wednesday fresh foods link up! i hope to see you again this week with more seasonal & real/whole food posts! xo, kristy.
Well…. I caved and bought an actual seedling mat – in part because there was one right in my face at the garden center, and in part because I needed my heating pad. 🙂
Thanks for the tips! I’ve tried starting from seeds in the past but with not much luck.stopping by from Diana’s pin me!
It really did take me a few years to have success. Some folks seem to be able to just throw the seeds in some cups with some dirt and that does it, but I have a feeling there’s more to that than meets the eye. 😉 Thanks for stopping by Christine!
I’ve been wanting to try seed starting – Thanks for tips!
It can be so rewarding, when you get one to go from start to finish! Thanks for stopping by Becky!
Pingback: Plant Your Own! | my sister's pantry
Pingback: Lady Behind the Curtain » Cast Party Wednesday: Link Party #79
Pingback: 76th Wildcrafting Wednesday « Mind Body and Sole
Pingback: Welcome to Wildcrafting Wednesday! | Sustain, Create and Flow
Pingback: Wildcrafting Wednesday! « Bella Vista Farm
Thanks for sharing this on Wildcrafting Wednesday and Congrats on being featured!
Our pleasure and thanks so much!
Pingback: Wildcrafting Wednesday
I’ve used lights just like yours, only suspended over a workbench, and had great luck starting both vegetable and flower seeds. Thanks for the reminders in this post!
The lights have made more of a difference than anything else I’ve added. If we ever get a workbench area set up (and clean – haha), maybe I’ll put the whole operation there. Thanks for stopping by Mary Ann!
Thanks for these tips. It’s still a bit early where I am to start my seeds, but I plan to do some this year, so this post was very handy. 🙂
Glad to be of help!
This was & is a really good post! i also stated my seedlings from february the 17th. I have sown radishes, green & other lettuces, green courgettes, pumpkin seeds & cucumber seeds. Thanks for the extra & useful tips too! Good luck with it all!
Good luck to you – looks like Spring is starting early here… Thanks for stopping by!
I found you through TGP. This is a great post! I agree with almost everything you said. I teach beginning gardening to people who want to start victory gardens and I have found that the seed starting really trips people up. Hardening off is so key!
Thanks Shannan! I wish I’d had someone like you to help get me over the initial hump. The whole seed thing can be very discouraging, but so rewarding when it works out. Thanks for stopping by!
Great tips for saving money on fresh vegetables. Thanks for joining us for Fabulously Frugal Thursday.
Thanks Heather!
Hi,
Saw your link on Diana Rambles: Pin Me Linky Party #27. great tips. Thanks for sharing. Pinning!
Thanks for the pin and for stopping by!
Hmmm inspires me to rebuild my garden! Got you from Diana’s pin me link up. Pinning this!
Thanks Eve! Rebuild that thing! And thanks for the pin!
We have a similar lighting set up for seed starting that always worked well.
Thanks for sharing your tips at Fabulously Frugal Thursday!
Thanks for stopping by Barb!
Great to have you at Seasonal Sundays.
– The Tablescaper
It’s so wintery here still that I really haven’t thought about starting anything, but I guess all that much more reason to get going on it, since there will be less outside time for my plants! I like to grow herbs in the summer because they’re generally easy and it’s so much better then buying a bunch of stuff that you usually just throw away (parsley!!)
I so agree on the herb front – although I have TERRIBLE luck growing herbs from seed. Usually can get some thyme and rosemary going, but the parsley always craps out on me – I think I’ll get some seedlings as I agree with you – buying bunches is usually such a waste…
thanks for sharing with us over on the Sunday Showcase – I featured your post this week
I’m so embarrassed to have missed this comment! Thanks so much for featuring us and for hosting such a fun link-up every week!
I could leave an endless, gardener-geeky comment here but I’ll try to control myself… I sooo get your seed-starting pain. Ironically, the first three or four years that I started seeds, I had phenomenal success. Almost everything I planted came up…and most of my plants weren’t too leggy. My worst problem was that most plants got too big and sometimes became rootbound before I could transplant! I started strawberries from seed (little cream colored French berries), foxglove, salvias, amazing and unusual annuals and perennials whose names I’m not remembering…eggplants, every herb under the sun—including lavender, endless tomatos…I even successfully started a Japanese maple cutting and various rose cuttings. Etc, etc. Sheer gardening bliss. And then…we built a new house. Where I found not quite as much success starting seeds… but not too bad. I wondered why I’d been so successful before, as a gardening newbie… and figured it was just beginner’s luck. But I was happy to get at least a few plants from my many seeds, though now I was using a warmer and lights to try to ooomph my success. If I didn’t deadhead in my garden too religiously, I’d get volunteers, which helped offset the poor seed starting. And then…we built another new house. And my seed-starting attempts were soooo sad. Like…almost nothing made it. It didn’t occur to me that our new ultra-violet blocking windows might have something to do with it! I thought it was just one more reason to be homesick for my former home. So maybe next year, I’ll try it again with lights and shelves in the garage. It’s a little late to start anything other than super fast growing annuals inside now…
So fun to happen upon your blog. A fellow gardener. Yay!
Thanks! Lynaea @ EveryDayBloom.com
Thanks for sharing your story Lynaea. Weird how our super awesome windows are mucking up the garden, eh? Would love to hear if you have better luck in the garage. So delighted you found us! Good luck with your garden!
Pingback: Show Off Friday #51 -Double Features! | What-About.co
Love starting to think about planting time! It makes these last few weeks of winter tolerable
Kelly
I’d love to feature this but I do not see any linkbacks to Fat Tuesday (on any of your articles)…
I’m sorry Jill. I got ahead of myself. I’ll take care of it.
Pingback: Gardening in the Snow | my sister's pantry
Thanks for sharing on Mostly Homemade Mondays! Just to let you know, I am featuring THIS POST as my “Featured Post” – Congratulations! Hop over to the blog tomorrow to grab my button to display on your blog.
Sincerely,
Kelli @ The Sustainable Couple
http://www.thesustainablecouple.com
Wow what great tips on seed starting! Thanks for sharing with all of us!
I’ll have to look into that shop light trick this year.
Saw this on Treasure Box Tuesdays
These tips are so helpful and well timed (: Thanks for sharing. Maybe I’ll try to grow some herbs this year.
I so want to start plants from seeds, but I feel intimidated by a lack of space and light. I pinned this because your tips are so clear. Maybe I’ll figure out a way to do it.
It is that time of year to start thinking about are seeds and starting them!! Thanks for sharing!! Hey I would love it if you stopped by and shared your stuff on My 2 Favorite Things on Thursday – Link Party…it’s going on now!! I would love to have you!! http://www.cookinandcraftin.com/my-2-favorite-things-on-thursday-link-party-6/
Hello beautiful! Great post. I need to try this. Pinned and tweeted. Thank you for being a part of our party and we hope to see you on Monday at 7 pm. We can’t wait to party with you! Happy Valentines’ Day! Lou Lou Girls
Great tips. I just planted my seeds last weekend…I know, little late. My husband built me a greenhouse film over the garden so at least I can transplant them earlier. But, why didn’t I think of planting leeks? They are my favorite, lol!… I’m so glad you linked it with us at Thursday Favorite Things!
I am way, way behind with my garden this year and should have started seeds a few weeks ago. Guess it’s transplants for me this year!
Thank you for sharing these tips!
These are some great tips, I wish I have a green thumb, but I am terrible when it comes to plants 😦 Thank you for joining us at the Oh My Heartsie Girl Wordless Wednesday! I look forward to seeing you again next week!
Thank you for stopping by!
Awesome tips and tricks! We love gardening around our house. Thanks for sharing at the #HomeMattersParty – we hope to see you again next week. 🙂
~Lorelai
Life With Lorelai
Thanks for linking up on My 2 Favorite Things on Thursday!! Hope to see you tomorrow!! Pinned!!
Muy intenresante gracias
You are so welcome
Thru trial and error last year I did most of what you have done with 2 exceptions. First I use the larger size pot to begin with because I don’t do a massive amount of plants and it saves me from transplanting them. I just use potting soil and make a hole where I put the seed and fill that with seed starter soil. And second I am sooo using your gravel idea! Thanks for the tip!
You are so welcome! Hope it goes well for you!