
Happy Mothers Day to all of the Mommies out there. Especially my Mom & Mother in Law! Also - a Happy Birthday to my little sister!!
These flowers aren't very hard. The only thing I feel the need to really warn you about is:
You will more than likely burn yourself.
I can't avoid it each time I do this. But I think my fingers aren't very sensitive to burns from the years of accidental curling iron burns and learning my way around a glue gun. There are some more severe than others but the likelihood of burning myself each time I break out the hot glue gun is about 100%.
You can possibly avoid burns one of two ways: find some kind of gloves that won't glue themselves to your project, OR you might want to try a popsicle stick for this craft. You'll see where and why.

What you'll need (not pictured): Felt, scissors, hot glue gun, glue sticks (doesn't require a lot), *popsicle stick, or *protective gloves.
First step: Cut out a circle of felt...or something that resembles a circle. This doesn't have to be perfect, but if you feel the need you can find a circle to trace. The bigger the circle, the bigger the flower and vice versa.

Step Two: you can do this a couple of ways. I usually cut a strip of felt a couple of inches thick. Another way of doing this is cutting out more circles (smaller than the original and they'll gradually get smaller too) and then cut them in half. I like the strip way.

Step 3: If you're going with the strip, you'll begin cutting out half circles. I, personally, usually make mine look a little more like 1/4 of a four leaf clover. But really, it doesn't matter very much.

Step Four: I cut gradually smaller half circles down the length of the felt. Once I'm down at the end, I flip the strip over and start cutting even smaller ones on the other side.

Eventually you'll be left with this:

Step Five: You probably won't need ALL of the half circles you cut, but it's good to have them there for backup - or a second flower. Depending on how small you wand the flowers, this could easily make two. Now to begin the flower you'll take one of the bigger half circles you cut out. You'll put a strip of hot glue (be careful!) on the straight edge/ bottom of the half circle. Then you'll glue it to the outer rim of the felt circle.

Step Six: THIS IS WHERE YOU MAY WANT A POPSICLE STICK OR PROTECTIVE GLOVES. Or really, this is the step where you burn yourself. Ok: with either a popsicle stick, gloved finger or exposed fragile thumbs, WHILE THE GLUE IS STILL SOMEWHAT HOT, you begin pinching the sides of the half circle inward so the half circle stands up instead of laying flat.

Step Seven: Repeat. I like to glue the next half circle so it overlaps the last piece a little bit. You'll push the sides inward so half circle bows inward and stands up a little bit.

Step Eight: You'll keep repeating for the first row with half circles around the same size but remember to use pieces that gradually get smaller in size. Just keep overlapping a little and keep pinching and try not to get burned.
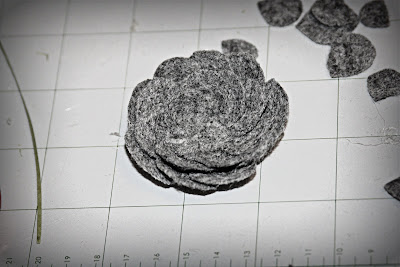
The likelihood of getting burned increases with the smaller pieces. I haven't tried the popsicle stick, but this is definitely where you'd want to use it. With the smaller pieces keep up the same overlapping and pinching.

Last step: (Not pictured) Once you get down to the smallest pieces, or really the last one, you'll glue the bottom and PINCH IT BEFORE YOU GLUE IT ON. So it's almost folded in half. (It's easier to see on the white flower below than the gray one.) That one you'll hold down while it dries to make sure it stays in that shape.
Once that last piece is on you can do whatever with the felt flower. I like to make these flowers for all different sorts of projects, not just accents.
 You could do the following:
1. Sew/ glue on a fabric strip on the bottom so it's easy to slide onto a headband/ alligator clip/ hair clip to wear around.
2. Glue on a pin/ bracket so it's easily added to a bag/ tote.
3. Glue onto a picture frame for a cute accent.
4. Glue onto a home accent piece like seen above.
5. Sew onto a small white onesie and give as a baby gift.
These can be put anywhere really.
So that's it. Again: please be careful.


Great tutorial! I always wondered how these were made! Love them!
ReplyDeleteFantastic tutorial!! I love how these look. Definitely going to try it out :)
ReplyDeleteI am always looking for ways to make flowers. Thanks for the tutorial! Get ready fingers of mine!
ReplyDeleteFound you on Sunday Showcase.
It‘s so nice that I found your blog about your link at 'Under the Table and Dreaming'. Of course I’ve scrolled a little and like what I see. Now I’m your new follower! ;)
ReplyDeleteTake care
Tine
Super cute! I love these flowers! The nice thing about crafting is that once you burn yourself with the glue gun enough, you kind of stop feeling it. And an extra bonus is if you ever decide to live a life of crime, you've long since burned off your fingerprints! They'll never catch us :-) Love the flowers!
ReplyDeleteRachel @ Maybe Matilda
Love these flowers, these are so cute. I really like.
ReplyDeletecute cute cute!!!
ReplyDeleteLOVE! These are great! Following Back! I won a necklace in a blog giveaway from Frenchy over at Le Chateaux de Fleurs this time last year--it was made of similar flowers and vintage jewelry. It now lives on Clinger, my men's dress form that is all dressed in women's clothes!
ReplyDelete~Mikey @ Shabby French Cottage
www.shabbyfrenchcottage.com
so cute!! i love the shape of them.
ReplyDeleteThanks for posting these flowers- they are darling! I am definitely going to make some! I am your newest follower! :)
ReplyDeleteCamille
Just when I thought I'm getting sick of making fabric flowers... I see something really pretty like yours(and with a tutorial too!) and I just know I'm making them :) Visiting from Keeping It Simple.
ReplyDeleteOH I LOVE THIS! They are so cute and look so simple to do. I have a sweater with a tiny hole just begging for a felt flower to cover it up. You have saved my sweater!
ReplyDeleteI LOVE those flowers. They look fantastic!
ReplyDeleteSuch cute flowers!
ReplyDeletewww.simplycadence.blogspot.com
cute and easy!! love that. thanks for sharing this at my party!
ReplyDeleteSuper cute and GREAT tutorial!! Thanks for linking up to Craft and Tell Tuesdays!!
ReplyDeletewww.cherishedbliss.com
Great tutorial. I love felt flowers. Thanks for sharing at my Swing into Spring party.
ReplyDeleteWay cute! Thanks for the tutorial!
ReplyDeleteCara
http://miscellaneousme.wordpress.com
SO adorable! I only knew one way to make felt flowers so I have one style in like 10 different colors for my little girls hair-thanks for helping me be able to mix it up a bit! :) Definitely following you now!
ReplyDelete-Angela
www.loveseweetlove.blogspot.com
Wonderful!! I have (way too much) felted sweater felt that would be great to make some of these and I've been wanting to make flowers to put on a stretchy headband for my daughter. Thanks! And I have to love a fabric tutorial that starts out warning me I will burn myself, lol.
ReplyDelete~Alissa
www.lissybug.com
oh, I always end up burning my fingers when I use a glue gun, lol! Thanks for linking this up to our Wicked Awesome Wednesday blog party.
ReplyDeleteThose are so cute...you could do so much with them! Great tutorial =)
ReplyDeleteVery cute! Thanks for the great tutorial!
ReplyDeleteGreat! Following you from 500dollarwedding.blogspot.com. I can definitely see how people could use these for anything!
ReplyDeleteLovely! I have a couple of sweaters that I'm going to felt and this will be a perfect activity. Thanks for linking to ShabbyNest.
ReplyDeleteThese are very detailed! I'll have to try these when I make some yarn wreaths next month! I like how you used neutral colors too! They don't look so...um, "felty" :)
ReplyDeleteStop by Soon!
Sarah practicalpraise.blogspot.com
WOW! That is so creative and it turned out so pretty!
ReplyDeleteThose are so darling! I especially love the grey color and I pretty much burn myself every time I use a glue gun too so its nice to know I'm not alone. :-) Thanks so much for coming by and sharing this with us at Inspiration Friday this week!
ReplyDeleteVanessa
These are so gorgeous, thanks for sharing the how to! I always burn myself with the glue gun too haha. I just call them my battle scars :) Thanks for linking up!
ReplyDeletehttp://www.lovelycraftyhome.com
I think I can do this!! Thanks for the great tutorial!
ReplyDeleteThey are so pretty. I am definitely going to try and make them. I have added this post to my linky laundry list this week. You can look at it here.
ReplyDeletehttp://literallyinspired.blogspot.com/2011/05/linky-laundry-list-2.html
brilliant my dear! thanks so much for partying with whipperberry!!
ReplyDeletekisses
These turned out great! Please stop by www.laughloveandcraft.com and link up to my Share the Wealth Wednesday Link Party! I'm your newest follower!
ReplyDeleteThis comment has been removed by the author.
ReplyDeleteThis is absolutely darling! I need to make a couple of these for my girls! Thanks for sharing at Make Something Mondays! I've featured you today! Come take a peek!
ReplyDeletehttp://sarahndipities.blogspot.com/2011/05/make-something-monday-link-party-11.html
~ Sarah
Such great flowers! Thanks for the tutorial!
ReplyDeleteI love these flowers. Need to get some felt and get started. They are beautiful. Thanks for the great tutorial. I always burn myself too.
ReplyDeleteRuth
These are SO SO pretty! love them. especially the gray one, such cute felt!!
ReplyDeleteThanks for linking up to Your Whims Wednesday! Hope to see ya again this week :)
Cute!!! They are adorable and came out great! I am visiting from Reasons to Skip the Housework and I am a new follower!!
ReplyDeleteHave a great day!
Michelle
www.delicateconstruction.blogspot.com
These are awesome! Thanks for sharing at my link party, come back soon!
ReplyDeleteI love this tutorial, found it on Newlyweds on a Budget! Thanks, I will definately be trying this in the near future!!
ReplyDeleteI misplaced my glue gun months ago and I haven't really had a big enough incentive to find it...I think I might just have to hunt it down tonight! These are so stinking cute!! They will look adorable on my little girls. Off to find my glue gun...and some felt!
ReplyDeletehttp://www.sugarandspiceandallthingsiced.com/
Love how these turned out, thanks for the tutorial!
ReplyDeleteJust wanted to let you know I used this tutorial for a flower I made out of an old wool sweater and it turned out beautifully! Thanks so much for this tutorial!
ReplyDeletelove this tutorial. thanks for sharing! love your blog too. i'm new. glad i found you on (pinterest) :D
ReplyDelete