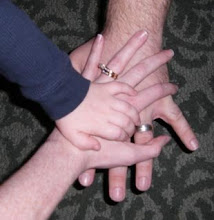
 The above picture is me playing around trying to figure out how to bring my little branch to life. The branch is a Maya Road chipboard that I covered is some Distress Ink Walnut Stain Crackle Paint. The leaves are snippets of the canvas I used to cover the frame (more about that later). The flowers are some old ones that I've had laying around. Once I decided on their palcement I used Helmar's 450 Quick Dry (LOVE this stuff as it works on so many different textiles).
  Here's another little peek into how I work. Notice the Root Beer? When I am working late at night (you know late, 9:30/10:00 pm LOL) I like to have it to keep my energy up. I've also got my newest fav in the glue department (Helmar's stuff it GOOD and YMH is selling it now. Gotta love Kristina cause she knows how to pick the good ones). You can even see a little peek of the little bird I created with more Maya Road chipbaord and Tim Holtz tissue tape.
 Now this pictue gives you a peek at the start of a layered detail for my frame. I don't do layers as it scares me. I always feel you must see everything I use even though I love the look of the layers others create with. This is something I am trying to work with more and this project really had be enjoying it. Some more of my fave is being used here: Prima and Tattered Angles. The half flower is one I had left over from a previous Prima project and I was dertermined to use it in this one. The frame is TA that I sponged Vintage Photo and Waltnut Stain Distress Ink over and then sprayed some Old Lace and Sand Glimmer Mist. For the mat, I glued a piece of a dictionary page and then white washed over it (or at least tried to anyways). I thought the dictionary page was a great touch since this is becoming a "book" project.
 Here I am trying out some different layer ideas. I took a TA chipboard letter and sponged Broken China and Faded Jeans Distress Inks and then sprayed Blue Sky GM. So yummy IRL. This is also where I discovered that I'm going to need something to help raise the frame for my embellies behind it. I wonder what will be used...
 More pictures of me trying to figure out how I want everything to look. This was the longest part for me I think. I would get it just right and then have another inspiration hit and had to start over. Lots of playing around. In fact, I had to take a little break to give my brain a break (ok, really the dog wanted to be let out but it sounded good, lol).
 And this is the final product of the layer corner I created. Squeal! I am so happy with how it turned out. The flowers are Prima and the little sprig is from a Prima vine that again I had left over from a Live with Prima kit (gotta love how you end out with extra goodies to play with after creating their projects). I was able to achieve me depth using Helmar's Scrapdots. That really is an amazing product cause I get to control the height I need and I can put gloop it on big or small. I thought the corner need a little something more so I created a little book banner using a PTI die. I sponged the edges with Vintage Photo and Walnut Stain to continue with the color theme. I also wanted to create a visual triangle with the blue and white so I had to take two white flowers and spray them with TA's Blue Sky GM. The frame is raised off the dictionary page and then that is raised at the top with the Scrapdots and slopes down where I used the 450 quick dry to glue the bottom half down directly to the frame. I really like the effect it gave.
 Here is my final branch piece. Since it's spring time I decided to add little blossoms to the branch. I so need to find more of these sweet little flowers cause they were perfect for this look and I would LOVE to do it again on another project (but need the flowers first). I decided to add just a little bling as it was looking rather dull after all the details I put into the bottom layered corner. I took my smallest rhinestones and stuck them on. It gave it the perfect amount of bling without looking out of place since I didn't use it anywhere else on my project. The bird is covered with Tim Holtz's dictionary tissue tape and then I sponged it with the Broken China and Faded Jeans Distress Inks. Once done I sprayed TA's Blue Sky GM, let dry, and repeated to get the effect I wanted. Then I white washed just slightly around the wing to allow it to have some depth. I really wanted something to hang from the branch, but after looking through my supplies nothing seemed right. That might be something I come back to later (they say a project is never really done right).
  And finally here is my final project. The sticky back canvas was sprayed using Ranger's Color Wash in Lettuce and they sprayed over in TA's Meadow (I think) Glimmer Mist. I chose green because I made me think of the leaves in a tree and since I was using a branch it made since to me. I then sponged the edges with Walnut Stain Distress Ink. Everything was glued to the canvas using the 450 Quick Dry. I hope you enjoyed the project and the little peek into my thought process in creating a project.
Challenges used:
A Spoon Full of Sugar - tons of texture
Papertake Weekly - anything goes
Tuesday Throwdown - spring inspired (the colors, blue bird and flowered branch was inspired by spring)
Creative Inspiration - punches/dies (I used the PTI banner die to create my banner)
Moxie Fab World - a gift for someone (this may just go to our dear school librarian) 


12 comments:
So pretty! Congrats on having your card featured on Moxie Fab (in the list of things featured)!
Great frame!. I also sometimes have trouble layering. I may have to case this. The little bird is my fave!
Holy moly cassie~ your frame turned out gorgeous!!!! It was so neat to see your creative process too :) I'm sure this gift will be loved & treasured. TFS - hugs
This is really quite beautiful! The branch is really amazing - and Barg's is a fav of mine for late night crafting - keeps me movin' and caffine free so when I wasn to crash, I can. Thanks for your sweet comments on my project for PC's 350 Cards and Gifts blog hop!
This is beautiful, love that green background. You did a wonderful job with your tutorial like post too!
FABULOUS!!!! (and congrats on the moxie feature!)
I LOVE it! and so glad you shared your crafty process with us. I think I can help you out on finding some more of those little tiny flowers ;)
HUGS!
What a lovely piece you've created!
This is sooo pretty!! Thanks for sharing the creatingof the frame with us too. Thanks for joining us at Papertake Weekly :)
This is breathtaking! Great job!!
Hey Cassie! Thanks for linking this up to the Home Decor Challenge in the Moxie Fab World in celebration of 350 Cards & Gifts Week! Good luck in the random drawing! :)
Congratulations on your featured card. This is a really beautifully framed project and it says so much!
Post a Comment