Since January is the month of all things organization, its high time I got one thing organized…my recipes! I’m a bit of a lazy recipe collector in that I like to clip and file. Please don’t make me copy my recipes to an index card, there’s NEVER enough space!
For the past couple of years, this has been my system:
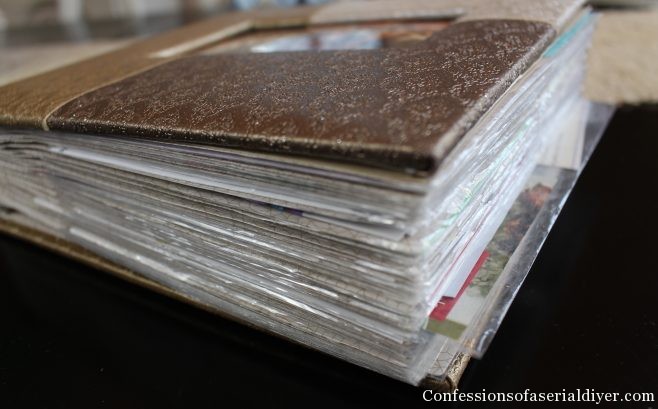
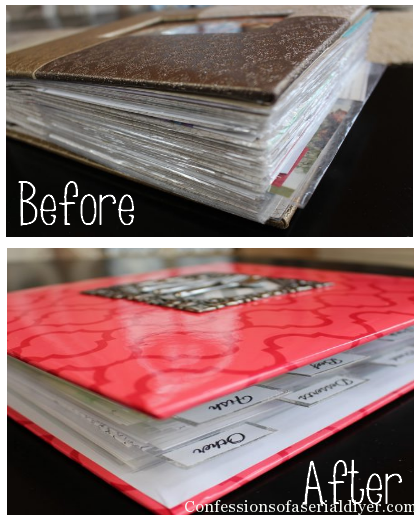
I know, not much of a system. This is a photo album and what I love about it is that I can just slip my recipes the plastic sleeves and move on.
But as my collection has grown, it’s getting increasingly difficult to find what I’m looking for. Now if that got me out of cooking, that would be great and we wouldn’t be having this little visit right now.
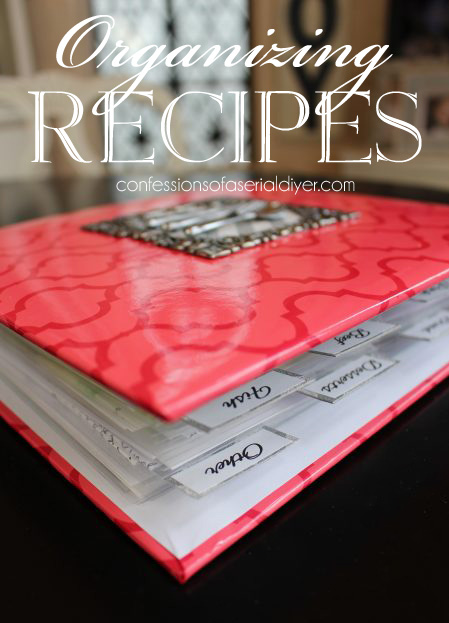
But since it doesn’t, I decided to search for a solution and I found just the thing at Michaels. This binder and coordinating inserts are from the “Becky Higgins Project Life” collection. (This is NOT a sponsored post, just love these and want to share!)

I didn’t want a regular three-ring binder. I wanted something more compact and this ($14.99) was perfect. I also picked up pretty card stock and some embellishments for the cover.
The obvious first step: insert plastic inserts!
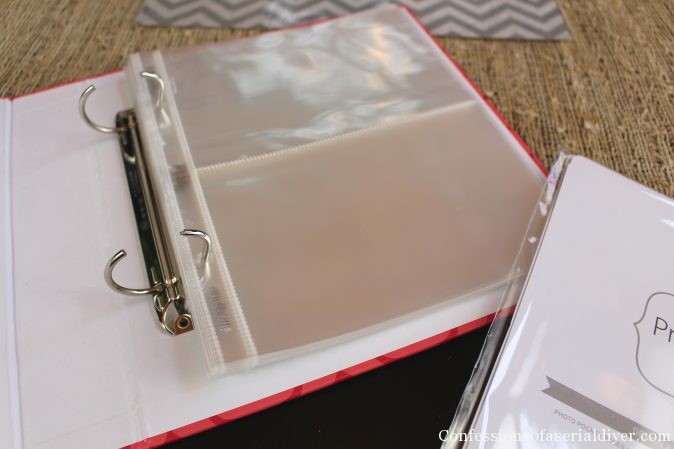
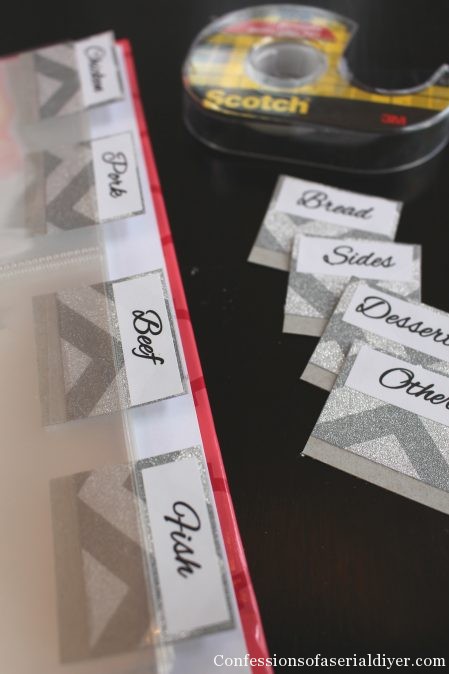
These plastic sleeves ($4.99 for 12) hold 4X6 cards or whatever else fits in a 4X6 space (since you know how I feel about cards 🙂 ).
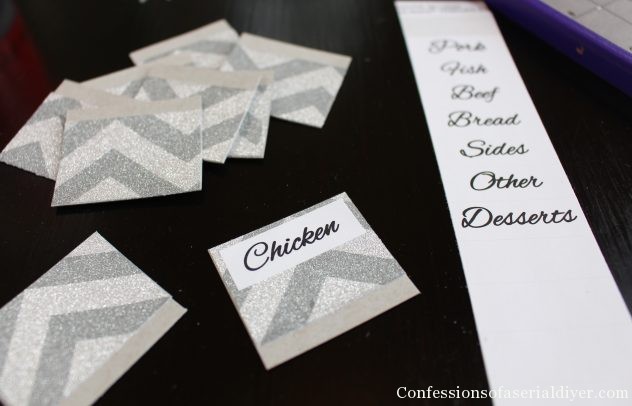
I searched for dividers, but I didn’t find anything that I liked so I decided to make my own tabs for each section.
This pretty chevron paper I found came with a stiff, thin piece of cardboard (more like a very thin chip board) to help protect it from bending in the package. The paper wasn’t stiff enough on its own, but gluing these together was the perfect solution! (I actually thought the paper was what was stiff and that’s why I bought it, but soon realized it wasn’t.)
First I cut 1″ strips of card stock and 1 1/4″ strips of the thin cardboard.
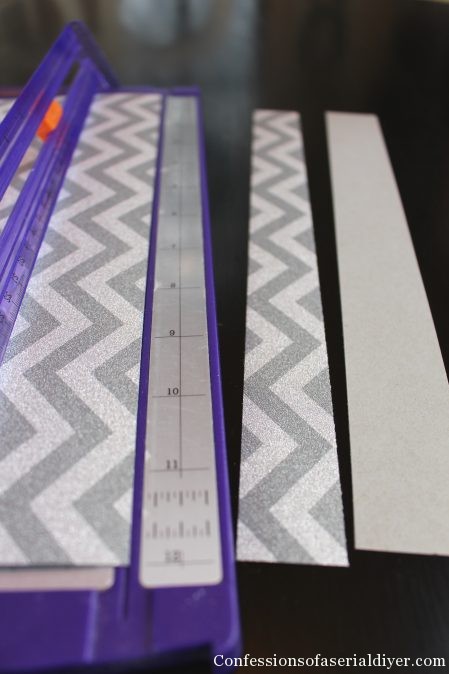
Next I used Mod Podge like a glue to adhere them to one another and then cut them into 1 1/2″ pieces to create my divider tabs.
I printed my section headings on return address labels. Then I trimmed them on either side and adhered them to my tabs. I had to add an “appetizer” tab, but I kept my sections really simple. I love that I can make it my own!
I used double-sided tape to attach them to the underside of my inserts. I cut the cardboard strip a bit bigger because I thought the tape might adhere better to that part than the glittery paper.
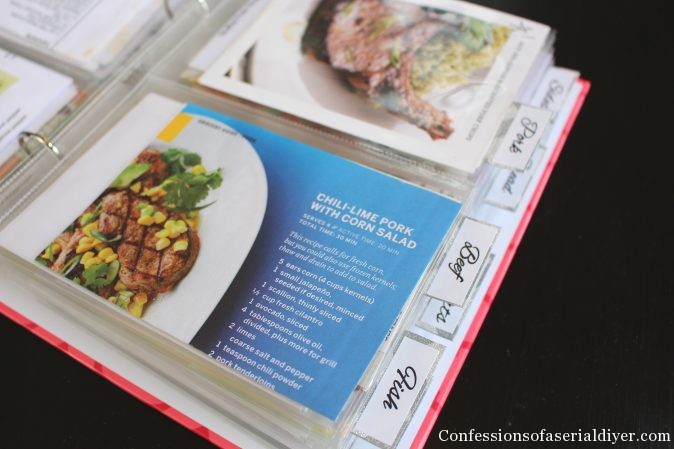
Time to load it up with recipes!
I am loving it!! It’s so much more functional…and pretty!
The last step was adding the embellishments I purchased to the front. I mod podged the paper on and used E6000 glue to attach the metal pieces.

It feels so good to organize something that has been driving me crazy! It’s so much easier to find things now!
I guess that means I’d better get cooking!
Now if I could only find the motivation to clean the garage…I think I’ll go pull out my new recipe book and hold it for a while instead. 🙂
XO,
![]()
If you like what you see, there are several ways to follow along! ![]()
Email * Facebook * Pinterest * Hometalk * Twitter * Instagram
I love to share at some of these great parties:
Home Stories A to Z Not Just a Housewife Kammy’s Korner The Happy Housie Design Dining and Diapers Liz Marie Blog Funky Junk Interiors Savvy Southern Style Tatertots and Jello DIY Show Off Redoux Interiors Between Naps on the Porch The DIY Dreamer Oh My Creative Little Miss Celebration Just a Girl and Her Blog Sand and Sisal Interior Frugalista House on the Way Addicted 2 DIY I should be Mopping the Floor Miss Mustard Seed

Paula@SweetPea says
Your recipe binder is both attractive and functional. I organize my recipes just like you do and love having everything in one place. I also like to flip through my binders when I’m looking for ideas for a meal plan for the week.
Christy K. James says
Thanks Paula! I like to be able to flip through and see everything easily too. Thanks for stopping by 🙂
ColleenwithJustPaintIt says
This is one of those great why-didn’t-I-think-of-that ideas! Project Life is perfect for recipes. Yay, another trip to the craft store 😀
Thanks for joining the tour this week, Christy!
Christy K. James says
Thanks, Colleen! I had never seen the Project Life collection before…I love it for this purpose. Thanks again for organizing this tour and have a great day! 🙂 XO
Andi says
Love this idea…know I’ll never do it. All my kids’ baby photos are sitting in giant Rubbermaid tubs and if I haven’t gotten around to that….
xoxo
-andi
Christy K. James says
Oh I’m awful…I haven’t printed or had had pictures printed off my computer in over a year!!
Therese @ Fresh Idea Studio says
OK that is seriously the most stylin’ recipe organizer I’ve ever laid my eyes on Christy! Love it! The fabu card stock, the utensils on the outside, and of course that you’re happy all you recipes are neat & tidy too!
Great project!
cheers
Christy K. James says
Thanks, Therese! I used it to cook today and was so afraid of getting it dirty ha ha! I’m so glad you stopped by! 🙂
Megan @ Rappsody in Rooms says
What a great idea! I definitely think having a recipe system by category is a great idea. It must make finding recipes so much easier! Tell that to my stack of helter skelter recipes…oh well. Thanks for sharing your system!
Christy K. James says
Ha ha, thanks, Megan! It was so much easier to make out my menu this week 🙂
Christy @ Our Southern Home says
This is such a fabulous idea!!! Mine are sticking here and there and everywhere! You have inspired me!!! ~Christy
Christy K. James says
Thanks, Christy! I’ve been needing to do this for way too long 🙂
Tami @ Curb Alert! says
Oh how I LOVE the tabs that you made, they are perfect! And the front is embellished so cute! It would definitely make me much more motivated to cook 🙂 Proud to be on the tour with you.
~Tami
Christy K. James says
Thanks, Tami! You are so sweet! I don’t know that I was more motivated to cook this week, but it was definitely easier to make out my plan for the week! Looking forward to seeing what you have organized! 🙂 XO
Cindy @ Diy beautify says
How awesome is this…pretty and functional! I love it 🙂 I have my recipes in binders/folders/recipe box…eek! Happy cooking 🙂
Cindy
Christy K. James says
Thanks, Cindy! It was SO much easier to plan my menu this week!! 🙂
Abby @ Just a Girl and Her Blog says
I think this may be the prettiest recipe binder I’ve ever seen! Excellent job, my friend! Pinning and sharing on Facebook!
~Abby =)
Christy K. James says
You are so sweet, Abby! Thank you! 🙂
Jen @ Girl in the Garage says
Great idea Christy! Your book looks so pretty and organized now. I love the dividers and tabs you made. Pinned 🙂
Christy K. James says
Thanks, Jen! I was putting that off for too long 🙂
Christine says
What a great recipe book! I made one years ago, but it’s definitely not as nice as yours!!
Thanks for sharing at From Dream To Reality! 🙂
Christy K. James says
Thanks, Christine! It’s definitely a step up from my worn-out photo album! 🙂
Athena at Minerva's Garden says
I like the tabs that you made for inside your notebook–very pretty, and a great way to find the recipe you want.
Christy K. James says
Thanks, Athena! It’s so much easier to find things now 🙂
Accidentally Wonderful says
I need one of these! I’d love it if you’d share this at my link party, going on now! http://accidentallywonderful.blogspot.com/2014/01/accidentally-wonderful-wednesday-2_21.html
Sam says
Okay so I am totally doing this! I have been complaining about my recipe file for ages, yours is so pretty and organised! Love it!
Christy K. James says
Yay! I’m so glad you feel inspired! Mine old system was awful! 🙂
Cathy says
Is that a 12×12 album?
Christy K. James says
Cathy, it’s closer to 9×9. The inserts are 6×8. Hope this helps 🙂
Diane | An Extraordinary Day says
Christy….everything you put your hand to is extraordinary!! I’ll be sharing this on my FB page.
Sorry to be so late in popping by…. Thanks for linking it up to Project Inspire{d}! Can’t wait to see what you’ve been “cooking” up this week!!
Christy K. James says
Thanks so much, Diane! Your sweet comments are always appreciated 🙂
Jen Ward says
What size is the binder? Where did you get the 4×6 sleeves?
Christy K. James says
The binder is 9 X 8 and both the binder and the sleeves are part of the Becky Higgins Project Life Collection, found at Michaels. I still love this solution for my recipes!
Betty819 says
I’m in the process of separating all the recipes I’ve printed off various websites now into categories. I found a pretty 3 ring notebook/binder at a thrift store yesterday for only $2. It looks brand new and it holds 375 sheets..I know some of those recipes I’ve pulled off, I’ll never make, so will discard them and keep only what I think I’ll prepare for a meal or with a meal. It’s going to be a long process project, especially with my ADD..I may end up just having a separate notebook just for Desserts. I’m sure my recipe notebook won’t be as creative as yours but I have to work with my own creativity or lack of any. I know what I like when I see it but don’t know how to put it together so it doesn’t look like hodgepodge. I really enjoy all of you bloggers and find inspiration from so many of your blogs.
Christy K. James says
This project was long overdue, but I really like this system. You can buy plastic sheets with different sized pockets at office supply stores. They might work well with your new binder. XO
Betty819 says
I use the 8 1/2 x11 sheet protectors all the time..I hate writing down a recipe even on those adorable recipe cards. Another thing I hate doing is starting a new address book..Have to go through mine now and recopy a lot of information, delete half of the names I have in it. I love pretty notebooks or address books but it is so time consuming to redo one.
Betty819 says
Thanks for your useful tips. I just read back over your reply and looked at your photos again of your binder and I already have the 8 1/2 x 11 sheet protectors, and a light bulb finally went off in my head just now; maybe I should buy some pockets that would fit a short recipe or a recipe might be on a recipe card already. Duh! Hey, sometimes it takes me a while to work smarter, not harder. Right now, there are so many projects I want to tackle running through my brain, that I don’t know where to start first.
Christy K. James says
Yes, the protectors with two smaller pockets per page would probably work great!
Tionna Guararra says
I absolutely love this binder and after searching tons of ideas for a diy cookbook I went with this idea 🙂 Just curious as to where you got the tiny utinsels? They’re so cute!
Thanks for the inspiration! 🙂
Christy K. James says
Thanks so much, Tionna! It’s been almost a year since I put this binder together and this system is still working perfectly for me. I found the mini utensils at Michaels. 🙂
cassidy says
This is amazing!! where did you get those page protector inserts! I’ve been looking for that exact thing everywhere!!
Love your blog BTW!
Christy K. James says
Thanks, Cassidy! I purchased everything at Michaels from the Project Life Collection. I wrote this a year ago, and my recipes are still perfectly organized. 🙂
Chad Ulrick says
I would like to remind you that you have a computer and you know how to use it so there is not a need for an analog cookbook
Christy K. James says
I can’t bring my computer to my counter top with butter and flower-covered fingers. Ever try following a recipe on an iPhone? Constantly have to tap and swipe to bring it back up…also a pain. Love my recipe book!
Kathleen says
Love your ideas and thank you for sharing. May I ask what font you used?
Christy K. James says
Thanks, Kathleen! This font is Alex Brush. It was a free downloadable font I found. 🙂
Chantel says
This is so cute! I,however, have a whole file drawer where my recipes are organized into folders….I would need far too many binders!! I love what you’ve done!!
Christy K. James says
Thanks, Chantel! Sounds like you have a lot of recipes. You would need a whole binder for each category! 🙂