Followers

Monday, April 15, 2024

Fun Shaker Card and Wand for Spring

 Hello My Crafty Peeps,

I hope you all are doing well and hopefully you are having some nice Spring weather now. Today I wanted to share with you a fun way to create a beautiful card using a fun Mushroom Shaker and Butterfly Shaker from Clear Scraps. I hope you are ready cause these are gonna be some show stoppers for birthdays, weddings, baby shower or any occasion you have this year. 

Let's get started, below I have a phot of what we will be using along with the links above the photo. Just click on the name and you'll be directed to the product at Clear Scraps. 

     Mushroom Shaker                                           Butterfly Shaker


#1 Shaker Card

To get started you will have 3 frames, a full piece which is the mushroom backing and an acetate piece which is the mushroom top that adheres to the frames.
Adhere two of the frames together and adhere the acetate piece to the top of the frames. 


In this photo I traced the top of the mushroom on my pattern paper then I adhered glitter glass to the top frame of the mushroom and adhered that to the acetate. 


Place you shaker bits inside and cover with the frames of the mushroom topper. For the bottom I did use dark wood glamour gel with paste and then used a fork to make my lines in the mushroom. 


I created my card from as this will an easel card. I placed my mushroom shaker in the middle. 


Here is the finished card front. I just love how this turned out with the wonderful mushroom shaker. 


#2 Shaker Wand

For this next project I am so excited to with how cute this came out. I absolutely love this wand and will probably be making more of them. I hope y'all like it too.

To begin you will cut two strips of pattern paper at 2 1/2 inches by 12; score 1/2 inch all the way down the strip. Then bend the scored lines back and forth like an accordion. 


Adhere ends together and then lay it flat out so its round, punch out a circle and adhere to the back and glue the center of the rosette. 


Next you will need a wooden dowel and cover with ribbon and use hot glue to adhere on the back and place another punched circle over it. You can decorate the back if you'd like.


Next put together the butterfly shaker the same as the mushroom shaker above. 
I added pink glass glitter to the frame that is on top of the butterfly shaker. 


I finished decorating it around the butterfly shaker with the flowers and little fairies I fussy cut from the paper collection I used. I also added on the back of the butterfly an action wobble which allows the butterfly to bounce and sway back and forth. 


Here are both the Mushroom Shaker card and the Butterfly Shaker Wand.
I just love how both of these turned out. Just so fun full spring and happiness. 


I hope you enjoyed todays step by step tutorial. Creating both of these was just so much fun. I hope this gives you some inspiration to try these shakers and take a look over at Clear Scraps Shop for more fun Shakers. Thanks again for joining me, take care I'll talk with you soon.

Happy Crafting Everyone, 


Thursday, April 11, 2024

Mother's Day Stair Cards

 Hello Crafty friends,

Glad you are here with me today. I'm in Mother's Day mode and so I have a couple of fun Mother's Day Stair cards for you today. I have a step by step tutorial below but I have the video tutorial for you that will show you more details. For these cards I used the April 2024 Card, Tag and More Kit. This has beautiful paper and ephemera by CoutureCreations. 

Here is the video tutorial.


April 2024 Card, Tag and More Kit


Card #1

To start off I have the diagram of the stair card for below. This shows where to make your tick marks so you can draw lines to create your stairs. The picture on the right side shows that I created another card and cut it in order to trace the side of the stairs and back of the flap of the stair to trace on pattern paper to cover the card. 

        Template 1                                            Template 2


To start off cut cardstock at 6 x 11 inches; Score at 4 1/4 inches. 
Next make a tick mark at 5 1/2 and 7 inches.


Next turn your ruler vertical place the ruler on the 5 1/2 inch tick mark and draw line down 1 1/2 inches; next to the same with have the ruler at the 7 inch tick mark draw a line down 1 1/2 inches. 


Connect the 1 1/2 inch lines by drawing a line across. 
Next place the ruler on the bottom left corner  with the 5 1/2 inch mark on the ruler on the line and make a tick mark at 6 inches and at 7 1/2 inches. Draw a small line to the 7 1/2 inch tick mark.  


Turn your ruler vertical place the ruler, draw a line 1 1/2 inches down from the 6 inches and the 7 1/2 inches. Next place your ruler in to the bottom of the lines and connect them. 
Now place the ruler with 6 inches from the ruler on the bottom corner of the line make a tick mark at 6 1/2 and 8 inches. (Shown below and video tutorial)


Again turn your ruler vertical and draw a line down 1 1/2 inches from the 6 1/2 inches and 8 inches. Connect the lines again to create a square. Set the ruler with the 6 1/2 inches in the bottom corner make a tick mark at the 7 inches and 8 1/2 inches. Turn the ruler vertical and drawn a line down to the bottom of the card as shown below. 


Next cut all the horizontal lines. I used my xacto knife to cut from one end line to the other end. 


Now we use the scoreboard to score the vertical lines we drew. If they score lines don't match up exactly with the drawn lines try to get as close as you can. Some of mine did not match up exactly but were pretty close to the line. 


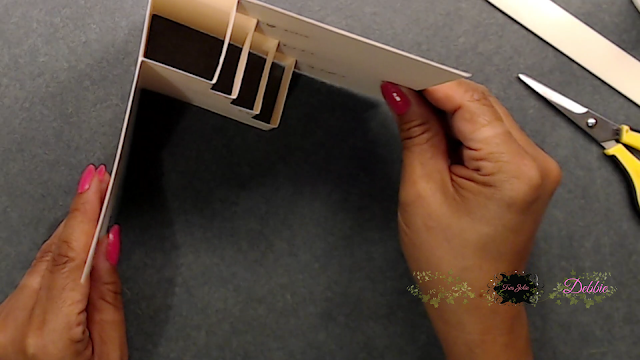
Next fold the 4 1/4 inch score line inward. The stair fold outward and the back flap/panel fold inward as well. 


Next cut another piece of cardstock 6 x 11 inches this is going to be the cover for the stairs. So place adhesive to the back panel and match up the ends.


Next match up the front panel to the card base/cover and adhere. 


This is how your card should stand. 


Here is what my card looks like papered. Again to get the front stair and back panel of the stairs cut out make another card and cut out the panels to trace on pattern paper. (refer to video tutorial)
For this card I used the pretty floral paper with the music notes. I just love how this turned out. 


For the card I did some fussy cutting of the pretty scalloped lace and used the Mother's Day sentiments inside the paper collection. I also used the beautiful ephemera pieces to decorate the outside and inside of the card. 


Here is the inside all decorated. I like how I created the beautiful bouquet of flowers on the left side panel and added some that trail up the sides of the stairs. I added another sentiment from the paper pack. I added the letter  Luv U on the stairs and outlines with gold stickles. I also added in some of the "say with crystals" from the kit. 


Card #2

For card #2 cut your cardstock at 11 x 6 3/4 inches; Score at 3, 4 1/2, 6 and 7 1/2 inches. Mark these measurements on your cardstock.

Next fold at the 6 inches, place your ruler at the top of the fold and make tick marks at the 1/2, 1 3/4, 2, 3 1/4, 
3 1/2, 4 3/4, 5, and 6 1/4 inches.
Fold at the 4 inch score line and Do the same tick marks as above.


Next connect the tick marks by drawing a line across from the one dot to the other as shown below. 


Next cut directly on those lines. Once your done cutting the small cuts get pushed to the back and the larger cuts come forward.


This is how your card should look once your done. Now it's time for my favorite part, to decorate our stair card. 


Here is the front of the stair card. I just love this green pattern paper with the pink cardstock and I also added some white glitter paper as the back panel. Again I added the Mother's Day sentiments along with some of the floral ephemera. 


Here is the card folded out. I added some fold letters from my stash and one of the cute charms from the kit to the card. 


I hope you enjoyed today's step by step tutorial. For more details you can always view the video tutorial process, which is at the top of the page. 
Thanks again for joining me, I have all the links listed for you throughout the post so just click on the words and you will be taken directly to the store. 

Wishing you all a great day and Happy Crafting. 


Thursday, April 4, 2024

Mother's Day Shimmer Vintage Tags

Good Day My Crafting Friends, 

I hope you all had a great Easter weekend with family and friends. Now that spring is here and we have celebrated Easter we now move into Mother's Day mode, right. This year hubby and I decided to have our Christmas stay up and decorate it for each holiday. We have done Valentine's Day, St. Patrick's Day and Easter it has been fun to see what we come up with for each holiday. For Mother's Day I saw how someone had decorated their tree with photo's of all the Mom's in their family and I thought that would be a great idea. So this project I will be decorating the Tags from the April 2024 Mixed Media Kit along with using some items from the April 2024 Card, Tag and More Kit

For more details on how I created these beautiful Mother's Day Tag you can view the process video below. 


    April 2024 Card, Tag and More Kit                           April 2024 Mixed Media Kit


To begin I traced all three of the large chipboard tags from the Mixed Media Kit onto the canvas and cut them all out.  


Next I sprinkled the cosmic shimmer shaker colors over the canvas and then sprayed some water on top. The water will allow the shimmer to activate to create a watercolor effect. 


Keep sprinkling the powder on the canvas and spray water when you need to get the desired look you want. Here is my first tag done. When you are finished let the canvas dry for at least a few hours before adhering to the chipboard. 


Here is another way to apply the cosmic shimmer shakers to the canvas resist. Place some water down and sprinkle in the water and mix and apply with a small paint brush as you see below. You can still spray with water in areas you would like to blend or you can blend with your brush. 


Here is the 3rd tag I created using the paint brush method. The canvas is so fun and turned out so cool I love them. 


For all three tags I used the photo inserts from the Card, Tags and More Kit and adhered them to the middle of the tag. Be sure to add double back tape to the back of the photo insert to secure it to the tag.  I will be adding photos to them. Next I also used the ephemera from the Card Kit to decorate the tag. 


Here are the finished tags. I placed photos of all three of my daughters with their kids. I just love how these turned out. with the canvas background and using the beautiful Couture Creations ephemera from the Card Kit they turned out beautiful. I also used the Say it with Crystals. The lace and ribbons are from my stash. 


I hope you enjoyed today's step by step tutorial. For more details you can always view the video tutorial process, which is at the top of the page. 
Thanks again for joining me, I have all the links listed for you throughout the post so just click on the words and you will be taken directly to the store. 

Wishing you all a great day and Happy Crafting. 


Thursday, March 28, 2024

Adventure Is Waiting Canvas

 Good Moring everyone, 

So good to be here with y'all again. Today I have a really fun and quick project for you using the March 2024 Mixed Media Kit from Tres Jolie. This canvas was so quick to create and so fun. I love using the mixed media kit along with other items from the Card, Tag and More Kit and Scrapbooking Kit. I know you are going to love this fun quick project. 


As always I have a step by step tutorial for you sharing the video process along with some photos below for your convenience. 


Here is what I used to create this canvas

Mixed Media Kit                                          Card, Tag and More Kit    used frame                                                      


                                                                       Scrapbooking Kit used chipboard key, the natural flowers, and cloches


To start I used the Stamperia Glamour Gel first. Just brushing it on over the canvas. Next I took the TCW Seafoam Stencil Butter along with the Creative Expressions Slimline Stencil from the February Mixed Media Kit and applied the butter in different areas of the canvas. 


Make sure the stencil butter is dry as it will smear, just a tip as mine smeared a bit. Next I applied the LindysGang Magical bayou boogie gold around the canvas and wiping it around. Set aside to dry 


I cut out the one of the clocks from the rice paper and adhered to chipboard circle to place inside the pocket watch. 


I then cut another clock from the rice paper and adhered on top of the previous clock and placed the clock inside. 


For this part use the chipboard frame from the Card, Tag and More Kit and place glue to the oval which is the center of the frame. Then place behind the lady and burnish down. 


Grab the frame and place over the oval until it fits.


Next turn over and add a bit of water to a towel and rub some water around the rice paper and tear off. 


Take the frame off and add glue to the inside center of the frame and place frame back on the oval piece. This will keep the frame on the rice paper. 


Next I took the Glamour Gel and brushed over the frame and key. 


I used the Magical bayou boogie gold powder put some down and added a bit of water, just a drop of two as you want it little dark. I then brushed on the frame in certain areas and some over the image to create a rust look on the edges. I did the same with the chipboard key from the scrapbook kit. 


I added everything together on the canvas. I did back up the words with chipboard, you can view the video tutorial as it will show all whole process from beginning to end. 


Thank you all for joining me today I hope you liked today's mixed media project. It was so fun to create this canvas and play around with the items inside this Mixed Media Kit. 
I have links throughout the post here and above showing the kits. 
Have a great day and Happy Crafting.