Friday, February 3, 2017

Food Color Fun


I am just having a little fun trying out calligraphy with water + food color. So much fun...loving how bright these colors look.


Have a great weekend.

Friday, January 27, 2017

A Rainy Day Window Card

I guess you could say that I started making this card at a couple of years ago. I had this idea of this wet window from the rain back then and even crated the glass with acetate and glossy accents and have been saving it ever since. Then the other day I notice this CAStology challenge week # 233 with the cue word Glisten and that was it. I let creative inspiration guide me : ) the rest of the way.


So I had the glass for my window. What to put behind the window? I decided on flowers and after looking through my floral stamps; I decided to got With this beautiful image Tulips Image. After water coloring it.Tip: after I am done water coloring I stamped ever the image again to bring back those lines that you could see now and bring more definition to the petals. then, came the frame which I created with my paper cater and also square dies. I new that I wanted to use vellum around the frame to soften the edge kind of like curtains do. 
I felt this card was meant be a Mother's Day Card. The card base for this card is made from water color canvas paper. I love the texture of it. 


I wanted to make this a big card, an A7size card (about 5 by 7 inches) so making the window was a little tricky since open was to big to through my cuttle bug to create the window in the card base, and I wanted the card base to be one piece of card stock. Then I figured that I could still run it through by folding it with the texture side folded in and placing my die as if I am making a window in the inside panel of the card. I hope that you understand what I am saying : ) before assembling the window I stamped the sentiment. I doubled the foam tape to to made the window have a bit of a shadow box look. and lastly I adhered a gray piece of card stock to the inside panel so that when the card is close there is a bit of color contrast.

I love how this card turned and I am so happy that I finally got use that window glass that I created years ago.


Happy Friday friends! I hope that you all have an amazing weekend.
Wednesday, January 25, 2017

I Adore You


Hi! I quick post. I actually made this card to play along in last week's Challenge over at Papertrey Ink's Make It Monday Challenge #272 Masked Heart Wreaths. I just didn't get around to taking a photo to share it before the challenge ended. This was something that I had been wanting to try so I am glad that I at least made the time to make it.

I used a heart die cut as my mask and stamped my little heart out with images from the PTI Daydreamer stamp set, the sentiment is from Altenew (Adore you) stamp set. I had fun adding gold touches to match the heat embossed sentiment. I used finetec arabian gold (a watercolor metallic paint) I brushed a little paint on the banner and then also sprinkled some of the paint onto that front panel.

Thanks for stopping by

Wednesday, January 11, 2017

Make a Wish

So, I am having a debate about this, my inspiration and plan was to create a card using the masked background technique but I am not 100% sure that if that is what this is.

This was inspired by Make It Monday #271: 2016 A La Carte and from that I picked  and from there I chose make It Monday #250 :Masked Backgrounds. Follow the link above and it will make sense. There still time to play if you want join in on the fun too.

Anyways, maybe I failed maybe I did not. Either way I had fun.


I masked my sentiment which is one of the dies from the Birthday Cheer Die Set. I then went on making the background with distress ink blending faded jeans and peacock feathers. Before removing the mask I dripped a bit of water here and there, quickly absorbing the water with a paper towel, after everything got dry I removed the mask and finished the card by...well I think you know how the rest goes.

Until next time : )

Monday, January 9, 2017

I Love You

\

I received a special request to remake this card. The original card was inspired by my kids and how much we have enjoyed reading The Kissing Hand Book.  Here a link to the first version of this card. I went about making this card for this sweet lady in much the same way I made this first one, except for a few things: this card I made bigger in A7 size instead of the A2 size, I used a bigger sentiment and for the text behind the hand I used text from the story in the book rather than just a text stamp. 


I really love this second version of this card too. It was sweet to have the opportunity to work on this card for this lady, she mentioned how she was planning to frame this and gift it to her friend whom had lost her child, this book I was told was very special to this mom and her child also. What a sweet friend and thoughtful gift. 


until next time : )

Edited to add this note :
The hand is a Silhouette America design that I cut with my Cameo Electronic cutting machine.

Thursday, December 22, 2016

Merry Christmas


After playing with this die cut Christmas for about a week, here is the end result. I ended up braving on and handwriting the word Merry after considering all my stamping options this idea seem to fit best and I think it works. What do you think? I hand wrote it with a calligraphy pointed pen by pressing the ranger distress ink pad onto my craft sheet surface and then with a wet brush I applied it to my calligraphy pointed pen right onto the nib, I put on my brave hat on and went on writing, thankfully it turned out okay. Yeepi! I did practice on a scrap piece of paper first and to make sure the shade of blue was going to be right.

It is my first time working with Tim Holtz distress water color paper and I love it, it was a dream to ink blend, the ink doesn't absorbed to quickly, which gives you more time to more the ink around and not get sponge edge marks, love it!

I used a Simon Says Stamp falling snow stencil to apply embossing paste onto the front panel after having done the ink blending part. The Christmas die is part of a Christmas Blessings Die also from Simom Says stamp. I die cut Christmas a few times and then glued those cuts together to give it a little thickness, I then did a little ink blending to the bottom of the die and also applied some wink of stella for a little Christmas shimmer : )


Thanks so much for stopping by.


Wednesday, December 21, 2016

2 Cute Retro Mailboxes


Hi! my crafty friends today I wanted share this. I made a similar design at the beginning of the year for Valentine's Day, back then I decided that I wanted to make one just like it for Christmas and so here it is...a whimsy Christmas, a retro Christmas mailbox. I am having a little or maybe a lot of fun with paper this morning ; ) 

For the Christmas one I just cut everything in red cardstock, did a little bit of ink blending using black dye ink to age the mailbox a little and then pretty much much copied and hand drew the design from the Valentines design. 

Here below is the Mailbox that I made for Valentine's at the beginning of the year I just didn't get around to sharing it with you all, but isn't it adorable. The name of the design is (Retro Valentines Mailbox) this is a cut design from Silhouette America that I cut using my Silhouette Cameo electronic cutting machine.


I hope that you all are enjoying the Christmas Season and as always thanks so much for stopping by. 

Monday, December 12, 2016

Christmas Calligraphy Fun


Near the tail end of last year I decided to learn calligraphy and it has been such a joy. This is my first time handwriting in one of my cards. So scary but awesome at the same time. I still have lots to learn but I really enjoying the journey. 

I am in love with this finetec arabian gold so pretty and fun to write with, 


For this card with an stencil I applied embossing paste to create the falling snow, I then die cut a few snow flakes in gold and white paper to layer lastly I hand wrote the sentiment and assembled the card. 


The snow stencil is from Simon says stamp, the embossing paste is by dreamweaver stencils, snow flake trio die is from Wplus9 design studio.

As always thanks for stopping by.

Monday, December 5, 2016

A Tag / Christmas Tree Ornament?


My goodness, I made this tag some years ago. It can't be denied that at first I had a little bit of a hard time giving it away but last year I really meant to attach it to gift, but guess what? At the end of the Christmas season I realized that I forgot to use it and so this year out it came of my box of seasonal goodies and I really hope that this little little tag finds a new home this Christmas season... and yes, this cute tag can totally double as a Christmas Tree ornament.


Thursday, November 24, 2016

Happy Thanksgiving!


Happy Thanksgiving Day my American friends, I hope that you are having a blessed day among those you love and sherish. 

Tuesday, November 22, 2016

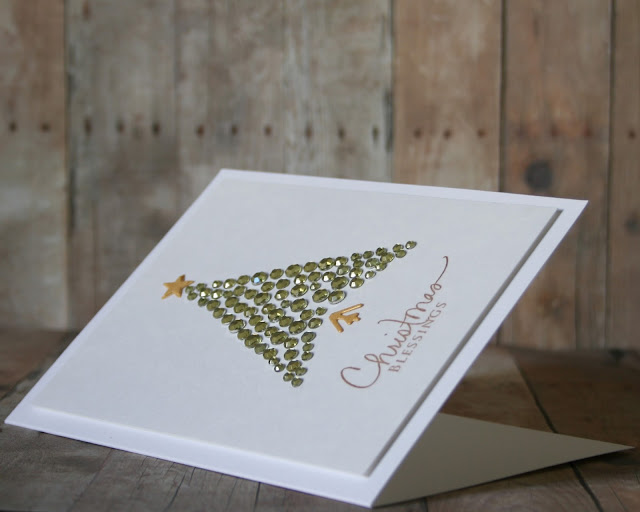
A Rhinestones Christmas Tree


Hi! Can you believe that I am not yet an owner of a Christmas tree stamp? is just crazy.
Some years ago I purchased a 100 pack of these self adhesive rhinestones and for one reason or another I had not found use for them until now. Thank goodness that they are green :) but I think it would be fun to make this design in other color rhinestones too, like pink would be so pretty. 

I started by, with a pencil drawing a tree shape and then filled in the shape with the rhinestones. starting at the tree corners with the smallest rhinestones, then worked around the edge at times alternating the size of the rhinestones and then finished up by filling in the middle using the size rhinestones that seemed to fill the space best. I then layered a few star dies to get some thickness, I cut a little part of a snow flake die for the bottom of the tree and finished the card by stamping the sentiment and applying foam tape to the panel and adhering it onto a card base. 

Call me crazy but I actually don't do just one design of Christmas cards to send to my family and friends. So I hope that you come back and to check out the Christmas cards that I am working on. 
As always thanks so much for stopping by! 


The stamped sentiment is from Papertrey Ink (signature Christmas)

Friday, November 18, 2016

A Simple Christmas Card

Hi! friends,

I am popping in to quickly share this simple card that I just made. I have a huge mess on my desk as a working on few different Christmas cards designs. This one was the first one done. Yay! I hope that you like it and inspires you to create something with your stamps.


I first stamp this bells image onto a red card stock with red die ink. I then spritz the panel with sparkle sheer shimmer ...love that stuff. I then cut and scored a white piece of cards stock to use as my base and stamped the sentiment with the same ink that I stamped the bells image and then stamped over the sentiment again with versamark to heat emboss it with clear embossing powder. I then moved on to assemble the card by first cutting my red panel, apply foam tape and adhere it onto my card base. That was it. I love how this card turned out. Not too bad for warming back up into paper crafting and hand making Christmas cards : )

Thanks for stopping by I hope that you have a wonderful weekend.


Stamps used are from Wplus9 Design Studio ( Silver Bells)

Friday, October 28, 2016

You Are Cherished


Yay! a little something that I came up with today after some inpiration from a couple of challenges going on. Make It Monday #265: Layered Dry Brushing.  and CAS(E) this Sketch # 196.

I really enjoyed creating this card.Using Fine Tec Arabic Gold in this way was really fun, plus is so pretty and sparkly in person. You can barely see it. but I also dry brushed the front panel with satin acrylic paint that I mixed with a bit of gel food coloring to create a teal color. I originally had not planned to have the sentiment peeking through the twine and metallic thread but it seemed like a fun idea and I decided to go with it.

I am so happy that it's Friday and that I got to play along in these challenges, I hope that you can play too and if not...enjoy your weekend and have a happy Halloween!


As always thanks for stopping by!

Update: (01/10/2017) I revisited this card and felt it needed a little something, something and I decided to go for it.
I guess it was meant to be since the change went pretty fast. Check it out here below. I die cut a couple of rectangles and layers them but before I layered them I brushed a little gold along the edge of both die cuts. I wrinkled a little the bottom rectangle and hand wrote hello on the top rectangle. After the ink dried a used some foam tape to adhere them over the previous stamped sentiment  : (  : ) I also sprinkled a little of the gold from the brush.


Monday, October 3, 2016

Fall Granola?!!


Why didn't I think of this before? I have been making granola for my family for years. This weekend it occurred to me to in addition to cinnamon I added a little bit of ground cloves, for a little bit of that fall flavor. It smelled amazing! as it baked, my kids thought that I was baking pumpkin pie!
I have enjoyed this recipe since I first tried it after seeing it in the Family Fun magazine back in 2010. I am sharing the recipe just as it was printed but the photo is from my own granola this weekednd : )

Crunchy Granola 

Around the holidays, even the sweetest tooth can get a little overwhelmed by all the treats. This nutty granola, presented in a glass jar with a handwritten label, makes a welcome — and incredibly tasty — alternative.
Ingredients
  • 4 cups rolled oats
  • 1 cup chopped walnuts or slivered almonds
  • 1/4 cup brown sugar
  • 1/4 salt
  • 1 teaspoon cinnamon 
  • 1/3 cup vegetable oil
  • 1/3 cup honey
  • (6-ounce) package dried sweetened cranberries or other dried fruits, such as cherries, raisins, pineapple, or papaya
Instructions

  1. Heat the oven to 300 degrees. In a large bowl, stir together the oats, nuts, brown sugar, cinnamon. Make a well in the dry ingredients and add the oil and honey. Toss the mixture until it is well combined then spread it evenly on a cookie sheet.
  2. Bake the granola until lightly browned, about 40 minutes, stirring every 10 minutes to keep the mixture from sticking. Let it cool completely, then stir in the cranberries or dried fruit. Makes about 7 cups.
Wendy's Tips: 
  • For a little Fall or Holiday flavor I added 1/2 teaspoon of ground cloves. 
  • The granola will get crunchy as it cools, so don't panic that is not crunchy right out of the oven. 
  • Sometimes we enjoy stretching out our granola with Bran Flakes Cereal. 
  • You can save yourself some clean up time by lining your pan with parchment paper.
Enjoy!

Thursday, September 22, 2016

Like Cotton Candy


This card makes me think of cotton candy.  This card was inspired by Diamonds, the Theme of the week over at Less is More Challenge #294 I went with element of sparkle that a diamond creates.

I used pearlecent Pigment ink to stamp the sentiment and created the somewhat ombre effect by inking one half of the stamp with one ink and the other half with another color. This little dew drop ink set of colors is just so pretty, I added a picture of the set that I used at the bottom of the post.

I was going to stop there but I just didn't look finished so I ended up using a the ink blending tool to apply a little bit of the same ink to the top and bottom of the card and finished it off by tying a little bow with metallic thread.
The photos do not do justice to how pretty this card sparkles. Also this pigment ink with this stamp the way Papertrey made it, it created this slightly raised image, which I just love. I am going to play a little more with these inks and stamp : ) Click on the photo for a closer look.


Thanks for stopping by my crafting friends.